
Confronting the Void: A Comprehensive Guide to Fixing the Windows Black Screen
Imagine this: You turn on your computer, expecting to see the familiar Windows desktop, your icons, your wallpaper – the gateway to your digital world. Instead, you are met with nothing but a stark, empty black screen. No taskbar, no icons, perhaps not even a mouse cursor. This “black screen” phenomenon is one of the most disconcerting issues Windows users can face, precisely because it robs you of the visual interface needed to understand what’s going wrong. It’s a digital void that leaves many feeling helpless.
When an experienced Windows user encounters this black screen, a few immediate thoughts come to mind. First and foremost, something is clearly amiss with the PC. The absence of the expected graphical output strongly suggests that the graphics subsystem – the complex interplay of hardware and software responsible for rendering everything you see on your display – is somehow involved. But knowing that the graphics are likely the culprit is only the beginning. The real goal is to banish the blackness and restore the functional desktop.
This guide is designed to walk you through the various manifestations of the Windows black screen in both Windows 10 and Windows 11 and provide a structured approach to troubleshooting and fixing the problem. We’ll start with the simplest, most common solutions and progress to more involved diagnostics, helping you systematically identify and resolve the issue, hopefully getting your PC back to normal operation.
Two Faces of Darkness: Black Screen vs. Black Screen with Cursor
Not all black screens are created equal. Windows users have learned to distinguish between two primary types, and the subtle difference between them can offer valuable clues about the underlying problem.
The Plain Black Screen
This is the most absolute form of the problem: the display is completely dark. There is absolutely nothing visible – no desktop, no windows, and critically, no mouse cursor. If you encounter this, your first check should be incredibly basic: Is the PC actually powered on? Sometimes, a failed shutdown or a power issue can leave the machine in a state where it appears off, or perhaps it powered off unexpectedly. Look for power indicator lights on the case or keyboard. If the PC seems powered on but the screen is blank, it suggests a fundamental failure in the system's ability to initialize or communicate with the display hardware from the very beginning of the boot process.
The Black Screen with Cursor
This variation is characterized by a completely black background, but with the mouse cursor clearly visible and often responsive to mouse movement. This is a significantly more common scenario than the plain black screen, and its presence is actually a relatively good sign. Why? Because the fact that the cursor is displayed and tracks your mouse movement indicates that the core operating system is still running, at least to some extent. The mouse driver is loaded and functioning, and the system is capable of rendering at least one graphical element – the cursor – on the screen.

In my experience, the black screen with cursor most frequently points to one of two likely causes:
- Failure to wake from sleep: The graphics subsystem might fail to properly re-engage the display when the computer resumes from a sleep or hibernation state. The OS is running, but the display output isn't being correctly initialized.
- Graphics driver issues: The software that allows Windows to communicate with your graphics card or integrated graphics chipset – the graphics driver – might be corrupted, crashed, or incompatible. Since the driver is essential for rendering the desktop, a problem here can leave you with just a cursor on a black background.
The presence of a responsive cursor means the system isn't completely frozen, and there's a high probability that the desktop can be restored using simple keyboard commands. These commands interact directly with the operating system or its display components, even when the standard graphical interface isn't available.
Your First Moves: Two Essential Keyboard Combinations
Even if you're facing a plain black screen with no cursor, these keyboard shortcuts are the absolute first things you should try. They are designed to trigger system-level actions that might kickstart the display or provide access to recovery options. Remember, these combos require pressing and holding multiple keys simultaneously.
Combo 1: The Graphics Driver Reset (Windows Key + Ctrl + Shift + B)
This powerful four-key combination is specifically designed to tell Windows to stop and then restart the graphics drivers currently running on your system. Most PCs have a single graphics driver managing the primary display output. However, systems with multiple graphics cards (like a dedicated GPU alongside integrated CPU graphics) or multiple connected displays might have more than one driver instance running. This command attempts to reset them all.
To perform this:
- Locate the Windows key on your keyboard (usually between Ctrl and Alt).
- Press and hold the Windows key.
- While holding the Windows key, press and hold the Ctrl key.
- While holding Windows and Ctrl, press and hold the Shift key.
- Finally, while holding all three keys, press the B key.
- Release all keys.
What should happen? You might hear a beep, and the screen might flicker briefly. On some systems, you'll see the disk activity light flash rapidly for a few seconds, indicating that the system is working. If the issue was a temporary glitch with the graphics driver, the screen may return to normal operation shortly after this sequence. The driver has been reloaded, and it is now successfully communicating with the display.
If you hear the beep and see disk activity but the screen remains black after a few seconds, it means the driver reset didn't fully resolve the display issue. It's time to try the second essential combo.
Combo 2: The Classic Three-Fingered Salute (Ctrl + Alt + Delete)
This key combination is legendary in the history of Microsoft operating systems. For decades, hitting Ctrl+Alt+Del on older systems would often trigger an immediate reboot – a last resort when everything else failed. However, starting with Windows NT and becoming standard in Windows 95 and later versions, this combination gained a new, more controlled function: it invokes the secure sign-in screen.
To perform this:
- Locate the Ctrl key.
- Press and hold the Ctrl key.
- While holding Ctrl, locate and press and hold the Alt key.
- Finally, while holding both Ctrl and Alt, press the Delete key.
- Release all keys.
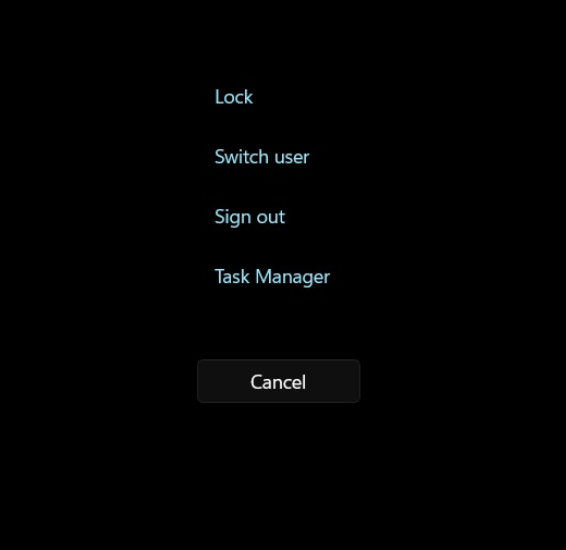
If successful, this should bring up the Windows secure sign-in screen (as shown in Figure 1). This screen typically offers options like Lock, Switch User, Sign out, Change a password, and access to Task Manager. Crucially, it also includes power options (Shutdown, Restart, Sleep) usually located in the lower-right corner, along with networking and ease of access controls.
Even if the graphics driver reset (Combo 1) didn't fully restore the desktop, invoking the secure sign-in screen via Ctrl+Alt+Del can sometimes force the display to repaint correctly. If this screen appears, click the 'Cancel' option. This action often dismisses the secure sign-in screen and may reveal your desktop, now functioning normally.
If neither of these keyboard combinations yields any visible change on the screen, especially if there was no cursor to begin with, it suggests a more fundamental problem that these quick fixes cannot address. In such cases, the next step is more drastic.
When Darkness Persists: The Forced Power Off
If the keyboard shortcuts fail to restore your display, the most reliable next step is to perform a hard shutdown of the computer. This isn't the ideal way to turn off your PC, as it doesn't allow Windows to properly close applications and save data, but it's often necessary when the system is unresponsive and the display is black.
For most modern desktop and laptop PCs, a forced shutdown is achieved by pressing and holding the physical power button. Keep the button depressed for about 10-15 seconds. You should hear the system fans stop, and any indicator lights should turn off, signifying that the power has been cut.
For desktop PCs with a separate power supply unit (PSU) switch on the back, you might need to flip that switch off after holding the power button, wait 30 seconds, and then flip it back on. This ensures any residual power is drained from the system components.
For laptops, holding the power button is usually sufficient. In rare cases, if the power button action has been reconfigured in Windows settings or if the laptop design prevents a full power cut this way, you might need to disconnect the AC adapter and, if possible and safe, remove the battery. For laptops where the battery is not easily removable, you may have to wait for the battery to completely drain, which could take several hours.
Once the PC is completely powered off, wait 30 seconds to a minute, then press the power button again to restart it normally. In a large percentage of black screen cases, this simple power cycle will resolve the issue. The system performs a fresh boot, re-initializing all hardware components, including the graphics subsystem and its drivers, which often clears the temporary glitch that caused the black screen.
If, after a forced power off and restart, the screen remains black, it indicates a more persistent problem. This is where more in-depth troubleshooting is required, and unfortunately, the further you have to go down this path, the higher the likelihood that a hardware failure is involved.
Advanced Troubleshooting for Persistent Black Screens
If the quick fixes – keyboard shortcuts and power cycling – haven't worked, you need to start systematically diagnosing the potential points of failure. This sequence of steps aims to isolate whether the problem lies with the display itself, the Windows operating system's boot process, the graphics hardware (GPU or integrated graphics), or other components.
Step 1: Test with a Different Display
One of the simplest ways to narrow down the problem is to eliminate the display itself as the culprit. If the PC seems to be booting (you hear fan noise, disk activity, or startup sounds if enabled), the graphics circuitry might actually be working, but the signal isn't reaching or being interpreted correctly by your primary monitor.
Try connecting your computer to a different display – another monitor, a TV, or even a projector – using a different cable if possible. Ensure the cable is securely connected at both ends. If the display lights up and shows the Windows desktop or login screen on the alternate display, you've successfully identified that the problem is with your original monitor or the cable connecting it. The PC's graphics subsystem is functional, but its output isn't making it to the intended screen.
If the screen remains black on the alternate display as well, it strongly suggests the problem lies within the computer itself, specifically with its graphics output capabilities.
Step 2: Boot into Safe Mode or the Windows Recovery Environment
If the black screen persists, the next logical step is to try booting Windows into a minimal state where fewer drivers and startup programs are loaded. This is the purpose of Safe Mode. Accessing Safe Mode when you have a black screen can be tricky, as you can't navigate the normal Windows interface. You will likely need bootable Windows 10 or 11 recovery media (like a USB drive or DVD) or rely on Windows' automatic recovery features.
Windows is designed to automatically enter the Windows Recovery Environment (WinRE) after two consecutive failed boot attempts. If your PC consistently boots to a black screen, try force-shutting it down (as described above) as soon as the manufacturer logo disappears or Windows attempts to load. Do this twice. On the third boot attempt, Windows should automatically load WinRE.
Alternatively, if you have bootable recovery media, insert it and configure your computer's BIOS/UEFI settings to boot from that media. The process varies by manufacturer, but typically involves pressing a key like F2, F10, F12, or Del during startup to enter the boot menu or setup utility.
Once you are in the Windows Recovery Environment, you will see a blue screen with options. Navigate to Troubleshoot > Advanced options. From here, you can access various tools:
- Startup Repair: This automated tool attempts to fix common startup problems that might prevent Windows from loading correctly.
- System Restore: If you recently installed new software or drivers that might have caused the issue, you can use System Restore to revert your system files and settings to a previous point in time when the PC was working correctly.
- Startup Settings (for Safe Mode): This option allows you to restart the PC and choose various startup modes, including Enable Safe Mode (usually by pressing F4 after the restart).
- Command Prompt: For advanced users, the Command Prompt allows you to run diagnostic commands, check disk integrity (
chkdsk), or manually manage drivers. - Uninstall Updates: Sometimes, a recent Windows update can cause compatibility issues, including display problems. You can try uninstalling recent feature or quality updates.
If you can successfully boot into Safe Mode and see the desktop (albeit a simplified one), it's a strong indication that the core Windows installation is functional, but a third-party driver (most likely the graphics driver) or a startup program is causing the conflict that results in the black screen during a normal boot. In Safe Mode, you can try uninstalling and reinstalling your graphics driver, running malware scans, or disabling problematic startup items.
If, however, the screen remains black even when booting from recovery media or attempting Safe Mode, it's highly conclusive that the problem is not just with the normal Windows boot image but with the fundamental hardware required for display output.
For more detailed guidance on using recovery media and the Windows Recovery Environment, you can refer to resources like “How to repair Windows 10 or 11 in 4 steps.” Additionally, specialized boot repair tools, such as the “Fix Windows Boot Problems” tool often found on rescue media from backup software like Macrium Reflect Free, can sometimes diagnose and correct boot configuration errors that prevent the display from initializing.
Step 3: Test with Different Graphics Circuitry (External GPU)
If booting into Safe Mode or using recovery media still results in a black screen, the focus shifts definitively to the graphics hardware. For desktop PCs with a dedicated graphics card, this might mean swapping it out for a known working card. But for laptops or desktops relying solely on integrated graphics (part of the CPU or motherboard), swapping isn't an option for testing.
In these cases, a useful troubleshooting step is to use an external graphics adapter, typically one that connects via USB 3.0 or USB-C. These devices contain their own graphics chipset and drivers and provide a video output port (like HDMI, DisplayPort, or DVI).
To use this method:
- Obtain a USB external graphics adapter. (A quick Newegg search can show you many options in the $60-$100 range).
- Connect the external graphics adapter to a USB 3.0 or USB-C port on your problematic PC.
- Connect a known working display to the output port on the external graphics adapter.
- Power on the PC.
If the display connected to the external USB adapter lights up and shows the Windows desktop or login screen, you have successfully demonstrated that the PC's internal graphics circuitry (either the dedicated GPU, the integrated CPU graphics, or the motherboard components supporting them) is the source of the problem. The external adapter bypasses the faulty internal hardware, proving that the rest of the system (CPU, RAM, storage, OS installation) is likely functional.
This step not only helps diagnose the issue but can also serve as a temporary workaround or even a permanent solution for desktops or laptops where replacing the internal graphics is difficult or impossible.
Step 4: Replace the Graphics Hardware
If all the preceding steps – keyboard shortcuts, power cycling, testing with different displays, and attempting to boot with external graphics – point to a failure of the internal graphics hardware, the final step is hardware replacement. The feasibility and cost of this step depend heavily on the type of computer and its age.
- Desktop PCs with dedicated graphics cards: This is often the easiest scenario. You can purchase a new graphics card and install it yourself, assuming you are comfortable opening the PC case. Ensure the new card is compatible with your motherboard and power supply.
- Desktop PCs with integrated graphics: If your PC relies on graphics built into the CPU or motherboard, replacing the graphics hardware might mean replacing the CPU or the entire motherboard. This is a more complex and potentially expensive repair, often requiring significant disassembly.
- Laptops: For most laptops, the graphics chip (whether dedicated or integrated) is soldered directly onto the motherboard. Replacing the graphics hardware means replacing the entire motherboard. This is a complex and costly repair, often requiring specialized tools and expertise.
You must decide whether this is a do-it-yourself project or if you need to take the PC to a professional repair shop or an authorized service center, especially if the device is still under warranty or a service contract. For older laptops, the cost of motherboard replacement might be close to or exceed the cost of purchasing a new device, making outright replacement the more practical option.
Peeking Behind the Curtain: The Reliability Monitor
Sometimes, even without a visible display, Windows manages to log critical errors. If you can eventually get your system to boot (perhaps after a power cycle or into Safe Mode), checking the Windows Reliability Monitor can provide valuable insights into what happened just before the black screen occurred.
The Reliability Monitor tracks system stability and events over time, including software installations, application failures, Windows failures, and hardware errors. It presents this information on a graph, making it easy to spot dates with significant issues.
To access the Reliability Monitor:
- Press Windows Key + R to open the Run dialog.
- Type
perfmon /reland press Enter. - The Reliability Monitor window will open, showing a graph of your system's stability history.
Look for red circles with 'X' marks on the graph around the date and time the black screen occurred. Clicking on a date will show you a list of events for that day in the table below the graph. Look for entries under 'Windows failures' or 'Hardware errors'.
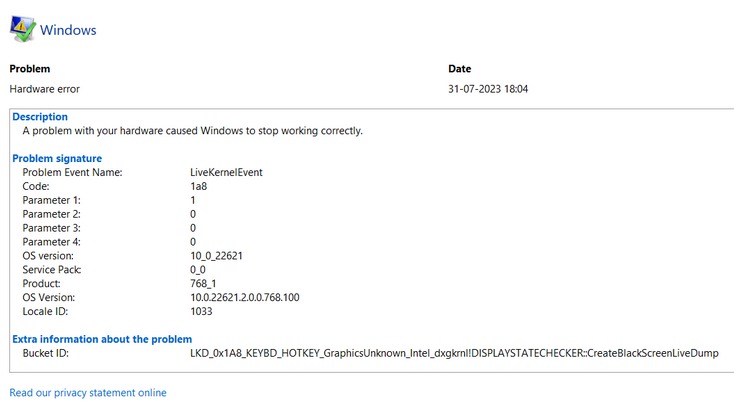
Since Windows 10 version 2004, Microsoft improved error reporting for black screen events. You might find an error entry with details that include terms like “LiveKernelEvent” followed by a code (e.g., 141 or 1a) or, as seen in Figure 2, a “Bucket ID” that contains the string “CreateBlackScreenLiveDump.” This specific entry is a strong indicator that Windows detected a black screen condition and attempted to create a diagnostic dump file. While the dump file itself requires advanced tools to analyze, the presence of this entry confirms that the OS was aware of the display failure and can help correlate the black screen event with other system activities or changes logged around the same time.
Checking the Reliability Monitor is a good practice after recovering from a black screen, as it might provide clues that help prevent the issue from recurring, such as identifying a specific driver version that crashed or a piece of software that conflicted with the graphics subsystem.
Conclusion: Banishing the Blackness
Encountering a black screen on your Windows 10 or Windows 11 PC is undoubtedly a frustrating experience, but it is often a solvable problem. By understanding the two main types of black screens and following a systematic troubleshooting approach, you can significantly increase your chances of restoring your display and getting back to work or play.
Start with the simple, non-invasive keyboard shortcuts – Windows Key + Ctrl + Shift + B to reset the graphics driver, and Ctrl + Alt + Delete to access the secure sign-in screen. These quick fixes resolve a large percentage of black screen issues, particularly those related to temporary driver glitches or problems waking from sleep.
If the shortcuts fail, a forced power cycle is the next essential step. This hard reset can clear many temporary states that prevent the display from initializing correctly.
For persistent black screens, be prepared to delve deeper. Testing with an alternate display helps rule out monitor issues. Attempting to boot into Safe Mode or the Windows Recovery Environment using bootable media allows you to diagnose whether the problem is within the core OS boot process or related to specific drivers or software. Using an external USB graphics adapter can help isolate whether the internal graphics hardware has failed.
Ultimately, if troubleshooting points conclusively to a hardware failure of the internal graphics components, replacement may be necessary. This can range from a simple graphics card swap in a desktop to a more involved and costly motherboard replacement in a laptop.
While a black screen can feel like a dead end, remember that Windows often provides tools and recovery options that are accessible even without a working graphical interface. By patiently working through the steps outlined in this guide, you can effectively diagnose and, in most cases, successfully fix the dreaded Windows black screen.