
Unlock Productivity: A Deep Dive into Microsoft OneDrive for Web and Copilot AI
Microsoft OneDrive is a cornerstone of modern digital productivity, serving as a robust cloud storage solution that seamlessly integrates with the Microsoft 365 ecosystem. While many users are familiar with its integration into Windows File Explorer or macOS Finder, the web version, OneDrive for Web, offers a powerful and often overlooked interface packed with features, including the latest advancements in AI via Microsoft Copilot. This guide delves deep into using OneDrive for Web, exploring its interface, core functionalities, sharing capabilities, and the transformative potential of its integrated AI features.
OneDrive for Web allows you to save, access, share, and manage your files from virtually any device with a web browser. Files uploaded through the web interface instantly become available across all your connected devices signed in with the same Microsoft account, whether it's your Windows PC, Mac, smartphone, or tablet. This cross-platform accessibility is fundamental to its utility, ensuring your important documents, photos, and other files are always within reach.
Beyond simple storage and synchronization, OneDrive facilitates collaboration. Sharing files or folders is straightforward, requiring only a web link. For Microsoft Office files (Word, Excel, PowerPoint), real-time co-authoring is possible directly within the respective web apps. Users with certain Microsoft 365 subscriptions can extend this real-time collaboration to the desktop versions of these applications, bridging the gap between web and installed software.
While the desktop integration is convenient for day-to-day file access, OneDrive for Web often receives new features first, particularly those leveraging cloud-based processing like the new Copilot AI capabilities. Understanding the web interface is key to unlocking the full potential of your OneDrive experience.
Getting Started with OneDrive for Web
To embark on your OneDrive journey, you first need a Microsoft account. If you're already using services like Outlook.com or if your organization utilizes Microsoft 365, you likely already possess one. If not, creating a new Microsoft account is a simple and free process, providing you with immediate access to OneDrive's basic features.
A free Microsoft account comes with 5GB of complimentary OneDrive storage, which is sufficient for many personal users. For those requiring more space, Microsoft offers various subscription tiers. Home users can upgrade to 100GB or more through Microsoft 365 Personal or Family plans, which also bundle premium versions of Office apps. Business users have options like the 1TB OneDrive for Business plan or comprehensive Microsoft 365 business plans, tailored to organizational needs. These plans not only increase storage but often unlock additional features and higher service limits.
It's worth noting that while OneDrive for Web is designed to function across modern browsers, performance and feature availability can sometimes vary. Microsoft's own Edge browser and Google Chrome are generally well-supported, ensuring a smooth experience. Also, be aware that some advanced features, particularly those related to Copilot AI, are tied to specific, higher-tier Microsoft 365 or Copilot subscriptions.
Navigating the New OneDrive for Web Interface
Accessing OneDrive for Web begins with signing in to your Microsoft account through your preferred browser. Depending on your subscription type, you might sign in via the general OneDrive page, the Microsoft 365 portal (formerly office.com), or onedrive.live.com for personal accounts.
Upon successful login, you're greeted by the OneDrive for Web home screen. This view is designed to help you quickly find files relevant to your current work. Prominently displayed at the top are cards highlighting important files, such as documents you've recently collaborated on, frequently accessed items, or files where you've been tagged. These cards provide quick action buttons, like 'Open' or 'Go to task', allowing you to jump directly into the associated application and file in a new tab.
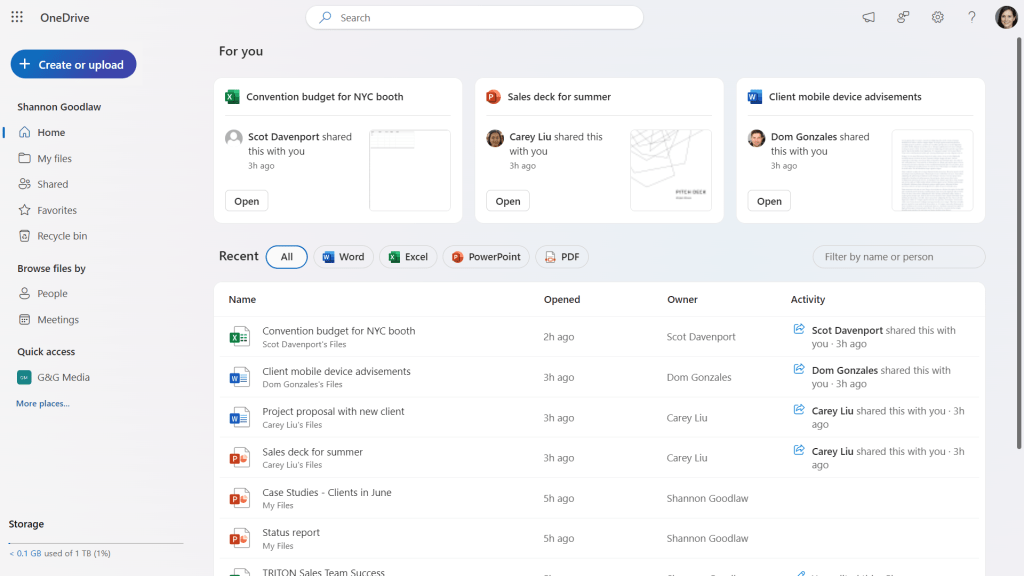
The OneDrive for Web home screen shows important files at the top, with recently accessed files below.
Howard Wen / Foundry
Below the 'For You' section, the main pane lists your recently opened files. This 'Recent' list provides a quick overview, showing who owns the file and recent activity, with the most recently active files appearing first. A helpful row of buttons above the list allows you to filter these recent files by type (Word, Excel, PDF, etc.), and a search box lets you quickly find files by name or the person associated with them.
Exploring the Left Navigation Pane
The left navigation pane is your primary tool for organizing and accessing your files in different ways. Below your name or username, you'll find several key views:
- Home: As described above, this is the default view, highlighting important files and listing recent activity.
- My files: This is the traditional file explorer view, showing all your personal files and folders stored in OneDrive. You can navigate through folders by clicking their names. A breadcrumb path appears above the main pane (e.g., 'My files > Documents > Reports'), allowing you to easily move back up the folder hierarchy by clicking on any parent folder name in the path.
- Shared: This view consolidates files and folders that you have shared with others and, crucially, those that others have shared with you. It's a central hub for collaborative content. Similar to the Home view, you can filter by file type or search by name or person to quickly locate specific shared items.
- Favorites: This section displays files and folders you've marked for quick access. You can favorite any item in your OneDrive or any item shared with you. To favorite an item, simply hover over it and click the star icon that appears. Clicking the star again removes it from your favorites.
- Recycle bin: This is where deleted files and folders reside before being permanently removed. You can restore items from here if needed.
For users with a Microsoft 365 work or school plan, additional navigation items enhance collaboration and access to organizational resources:
- People: This view organizes files based on who shared them with you. It lists individuals and the files they've made available, which is incredibly useful when you remember *who* shared something but not the file name or when. A filter box allows you to search specifically by person.
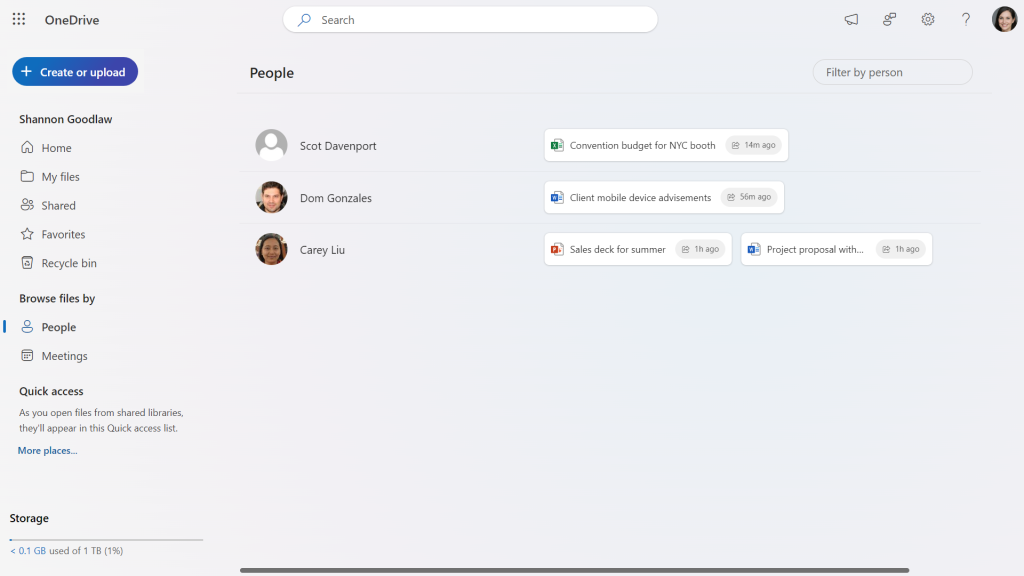
The People view organizes files by who shared them with you.
Howard Wen / Foundry
- Meetings: This view lists files that were shared within Microsoft Teams meetings you attended. It includes files attached to past meetings and those scheduled for upcoming ones, providing a convenient way to access meeting-related documents.
- Media: A dedicated view for browsing images and videos stored in your OneDrive, making it easy to find and manage your visual content.
- Quick access: This section lists SharePoint document libraries that you frequently access. Clicking a library name here opens it directly, allowing you to navigate its contents without leaving the OneDrive interface.
OneDrive for Web's integration isn't limited to the browser. It's also embedded within the Microsoft Outlook and Teams applications for Windows, macOS, and the web. The OneDrive icon, typically found on the vertical toolbar on the left side of these applications, opens your OneDrive directly within the application's main pane, presenting the same familiar interface and navigation options.
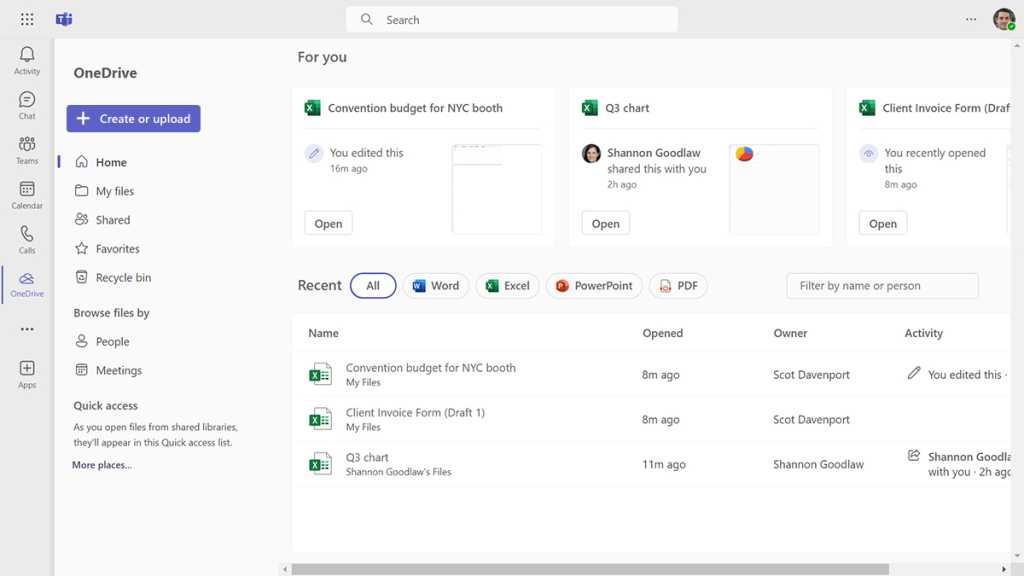
OneDrive for Web is integrated into the new Teams app.
Howard Wen / Foundry
Storing and Creating Files and Folders
OneDrive for Web makes it easy to populate your cloud storage. The primary action button for adding content is the '+ Create or upload' button, typically located at the upper left of the interface. Clicking this button reveals a menu with several options:
- Files upload: Opens your computer's file manager, allowing you to select one or more files to upload to your current OneDrive location.
- Folder upload: Similar to file upload, but allows you to select an entire folder from your computer to upload, maintaining its internal structure.
- Folder: Creates a new, empty folder within your current OneDrive location. You'll be prompted to name the folder and optionally assign it a color for visual organization.

Click the Create or upload button and make a selection from the menu.
Howard Wen / Foundry
The menu also provides options to directly create new documents using the web versions of Microsoft 365 apps: Word document, Excel spreadsheet, PowerPoint presentation, OneNote notebook, Forms, Visio drawing, and Plain text document. Selecting one of these options opens the corresponding web app in a new browser tab with a blank file, ready for you to begin creating content. The newly created file is automatically saved to your current location in OneDrive.
It's crucial to be mindful of your current location within OneDrive when uploading or creating files. The new content will be placed in the folder you are currently viewing. If you're on the Home screen, the item will be added to the top level of your OneDrive. To add an item to a specific folder, navigate into that folder first using the 'My files' view before clicking '+ Create or upload'. You can also reorganize files and folders later by dragging and dropping them within the OneDrive for Web interface, much like you would in your desktop file explorer.
The beauty of OneDrive lies in its synchronization. Any file or folder you add, rename, move, or delete in OneDrive for Web is automatically synced to your OneDrive folder in Windows File Explorer or Mac Finder (provided the desktop app is installed and running), and vice versa. These interfaces are simply different windows into the same cloud-based storage, ensuring consistency across all your devices.
Opening OneDrive Files: Web vs. Desktop Apps
OneDrive for Web offers flexibility in how you access and work with your files. For Microsoft 365 file types (Word, Excel, PowerPoint, etc.), simply clicking the file name in the main pane will, by default, open it in the corresponding Microsoft 365 web app in a new browser tab. This allows for quick viewing and editing without needing the desktop applications installed.
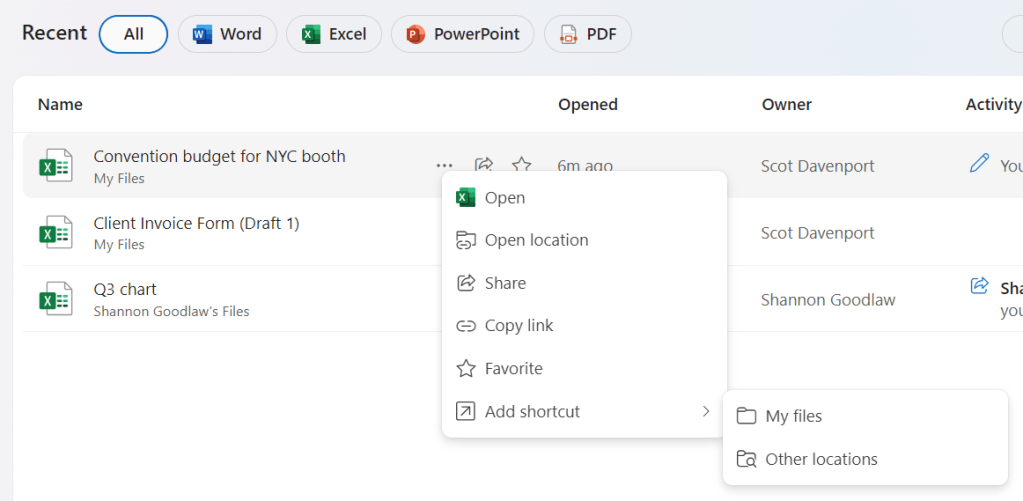
However, if you have a Microsoft 365 subscription that includes the desktop applications and they are installed on your PC, you have the option to open files directly in those more feature-rich desktop versions. To do this, hover over the file name and click the three-dot icon that appears, or right-click the file. From the context menu, select 'Open' and then 'Open in app'. The exact wording might vary slightly (e.g., 'Open in Excel'), but the function is the same. This action will prompt your browser to open the file using the installed desktop application. Keep in mind that browser settings, such as strict privacy configurations or ad-blockers, might occasionally interfere with this functionality.
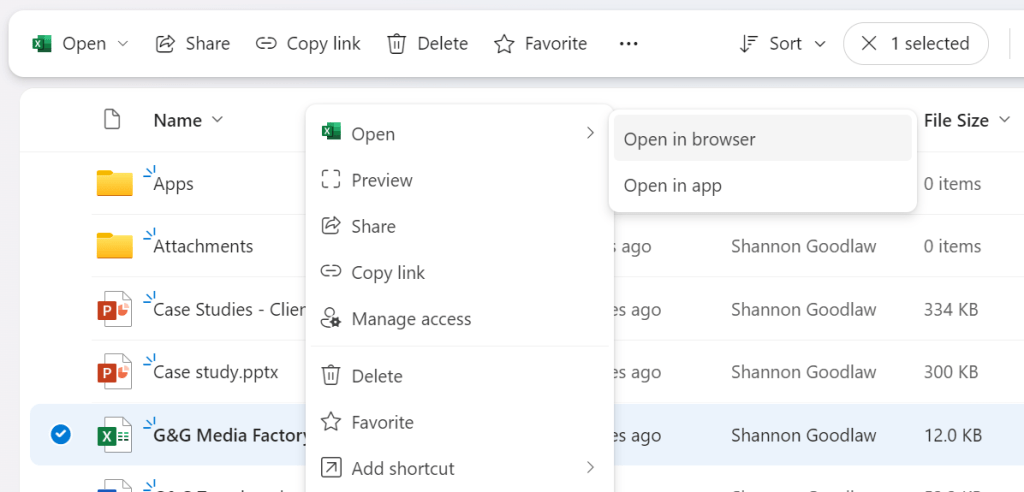
Opening an Excel file from OneDrive for Web.
Howard Wen / Foundry
This 'Open in app' functionality extends beyond Microsoft 365 files to other file types, provided you have a compatible desktop application installed. For instance, you could open a PDF file in Adobe Acrobat or another PDF editor installed on your computer directly from the OneDrive web interface using this method.
Creating Shortcuts for Easy Access
Managing a large number of files and folders can sometimes make it difficult to quickly locate frequently used items, especially if they are scattered across different directories or shared libraries. OneDrive for Web addresses this with a convenient shortcut feature. You can create a shortcut to any file or folder you have access to, including those shared with you by colleagues.
Think of a shortcut in OneDrive like a bookmark or a web link to the original item. It's a small file that, when clicked, takes you directly to the linked file or folder. The shortcut itself is a separate entity; deleting or renaming the shortcut does not affect the original file or folder it points to. This allows you to organize shortcuts in a way that makes sense for your workflow without altering the original file structure.
To create a shortcut, hover over the desired file or folder and click the three-dot icon, or right-click it. From the menu that appears, select 'Add shortcut'. OneDrive will then prompt you to choose the location within your OneDrive where you want to save the shortcut. Once created, the shortcut will appear in the chosen location, easily distinguishable by a small link icon.
Create shortcuts for quick access to key files.
IDG
Accessing Files Offline from the Web Interface
A significant enhancement to OneDrive for Web is the ability to mark files for offline access directly from the browser interface. Previously, this functionality was primarily managed through the OneDrive desktop client integrated into Windows File Explorer or Mac Finder, where you would right-click an item and select 'Always keep on this device'.
Now, you can achieve the same result within OneDrive for Web. Navigate to the file or folder you wish to make available offline. Select the item (or multiple items). Hover over one of the selected items and click the three-dot icon, or right-click. From the menu, choose 'Make available offline'.
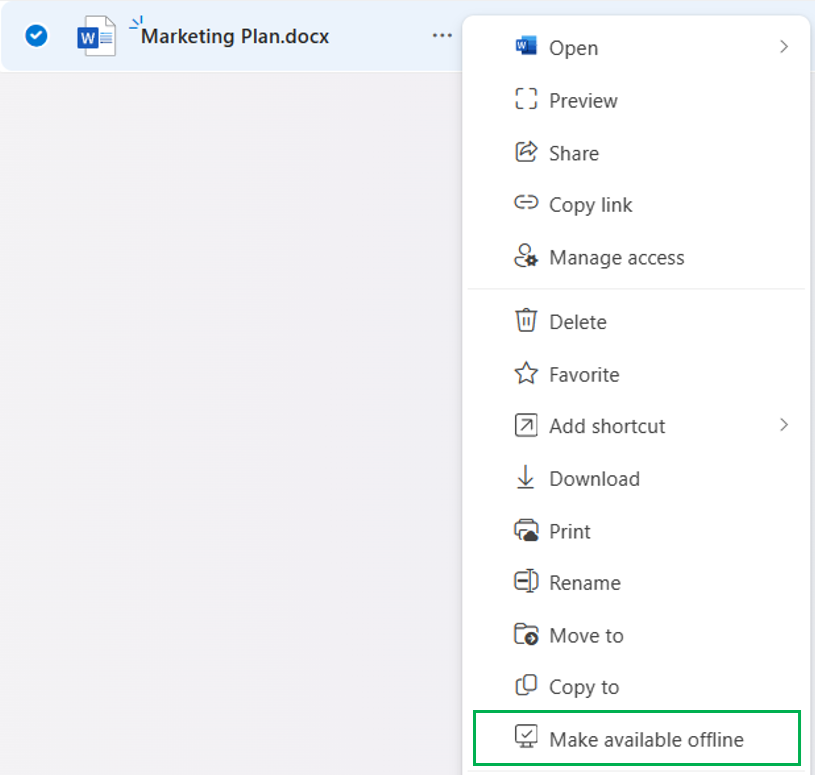
Choose Make available offline to ensure that you’ll always be able to access this file, even without an internet connection.
Microsoft
Selecting this option triggers a download of the file or folder's contents to your local device, ensuring they are accessible even without an active internet connection. A small icon, typically a computer screen with a checkmark, will appear next to the file or folder name in the web interface to indicate its offline availability status. Should you later wish to free up local storage space or no longer require offline access, you can reverse this action by selecting the item and choosing the corresponding option (e.g., 'Make online-only') from the menu.
Sharing Files and Folders in OneDrive for Web
Collaboration is a core function of cloud storage, and OneDrive for Web provides flexible and secure ways to share your files and folders. The primary method for initiating sharing is by hovering over the desired item and clicking the 'Share' icon, which looks like a square with an arrow pointing upwards or outwards.
Click the Share icon to begin sharing a file.
IDG
Clicking the Share icon opens a dedicated Share panel, which provides various options for controlling who can access your content and what they can do with it. The specific options available may vary slightly depending on whether you are using a personal Microsoft account or a Microsoft 365 account managed by an organization, as IT administrators can set restrictions on sharing capabilities.
Sharing with Specific People
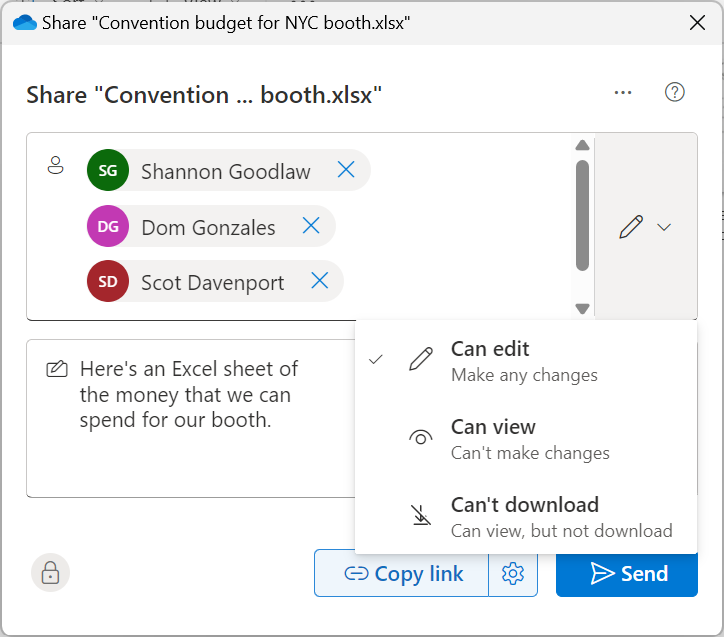
The most common method is to invite specific individuals. In the Share panel, you can enter the email addresses of the people you want to share with. If they are in your Outlook contacts, OneDrive will often suggest names as you type. Once you've added recipients, you need to define their access permissions.
Sharing and setting access permissions for a OneDrive file.
IDG
Clicking the pencil icon next to the recipient field allows you to select the access level. Common options include:
- Can edit: Grants recipients full control. They can view, download, forward the link, and make changes to the file or the contents of a shared folder. For Office files, they can co-author in real-time, and their changes are saved to the original file in your OneDrive.
- Can view: Provides read-only access. Recipients can view, download, and forward the link, but they cannot make any changes to the original file or folder contents in your OneDrive.
- Can review: Specifically for Word documents, this option allows recipients to add comments and suggestions using Word's review features, but prevents them from making direct edits to the document text.
- Can’t download: A more restrictive view-only option where recipients can see the file or folder contents in the browser but are prevented from downloading a copy.
After setting permissions, you can add an optional message to the email invitation that OneDrive will send to the recipients. Clicking 'Send' dispatches the email containing a unique link that only the invited individuals can use to access the shared content.
Sharing with Your Organization
For users within a Microsoft 365 organization, you often have the option to share a file or folder with everyone in your company. This is typically managed through the 'Link settings' panel, accessible by clicking the gear icon near the 'Copy link' button or at the top right of the Share panel. In the 'Link settings', you can select 'People in [your organization name]' to generate a link accessible by anyone within your company network.
Within the 'More settings' area of this panel, you can fine-tune the permissions for this organizational link, choosing between 'Can edit' and 'Can view'. Depending on your organization's Microsoft 365 configuration and your specific plan, you might also have options to set an expiration date for the link, automatically revoking access after a certain period, or require a password to open the link, adding an extra layer of security.
Once you've configured the link settings, click 'Apply' to return to the main Share panel. You can then click 'Send' to email the link to specific people within your organization, or use the 'Copy link' option to manually distribute the link via other channels like instant messaging or internal documents.
Sharing via Public Link
OneDrive also allows you to create a public link that anyone with the link can access, regardless of whether they have a Microsoft account or are part of your organization. While convenient for broad distribution, this method should be used with extreme caution, especially for sensitive or confidential information. Some organizations disable this capability entirely due to security concerns.
To create a public link, click the 'Copy link' button on the Share panel. By default, public links often grant 'Can edit' permissions, allowing anyone with the link to modify the file. It is highly recommended to adjust these permissions before sharing the link. Access the 'Link settings' panel (via the gear icon) and change the recipient group to 'Anyone with the link'. Then, under 'More settings', change the permission from 'Can edit' to 'Can view' unless you specifically intend for the content to be publicly editable. You can also set an expiration date or password for public links, adding some control over access.
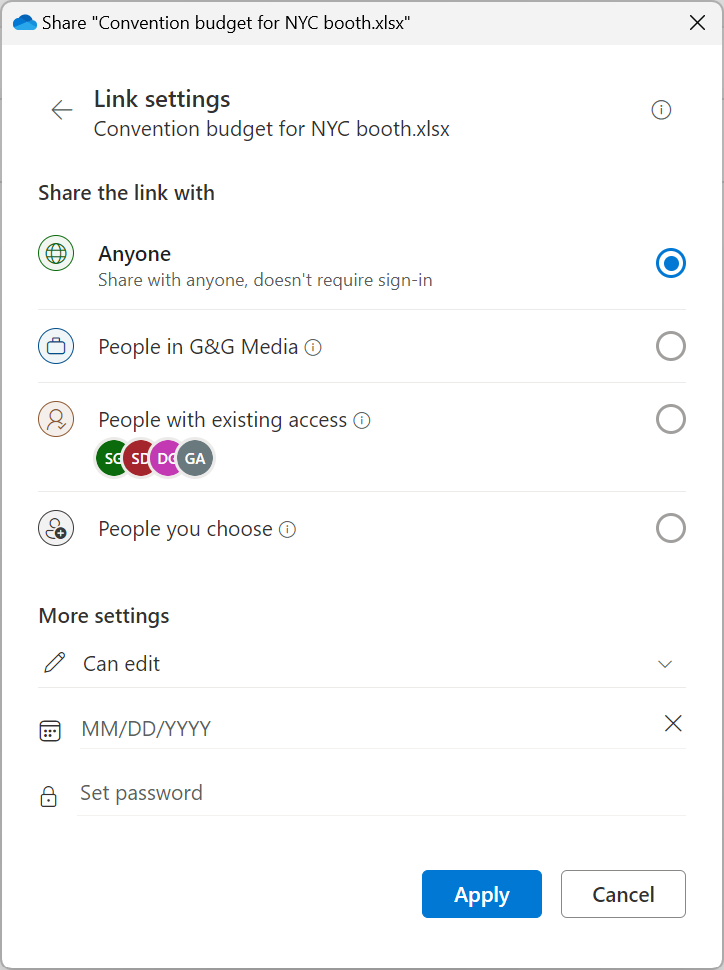
Use the “Link settings” panel to change who you invite and fine-tune access permissions.
IDG
After applying your desired settings, click 'Copy link' again to copy the link with the updated permissions to your clipboard. You can then paste this link into emails, websites, social media, or any other communication channel.
A quick shortcut for generating a public link with default permissions is to right-click the file or folder in the 'My files' view and select 'Copy link'. A notification will appear confirming the link creation, and you can click the 'Settings' icon within this notification to quickly adjust the permissions before sharing.
Managing or Stopping Sharing
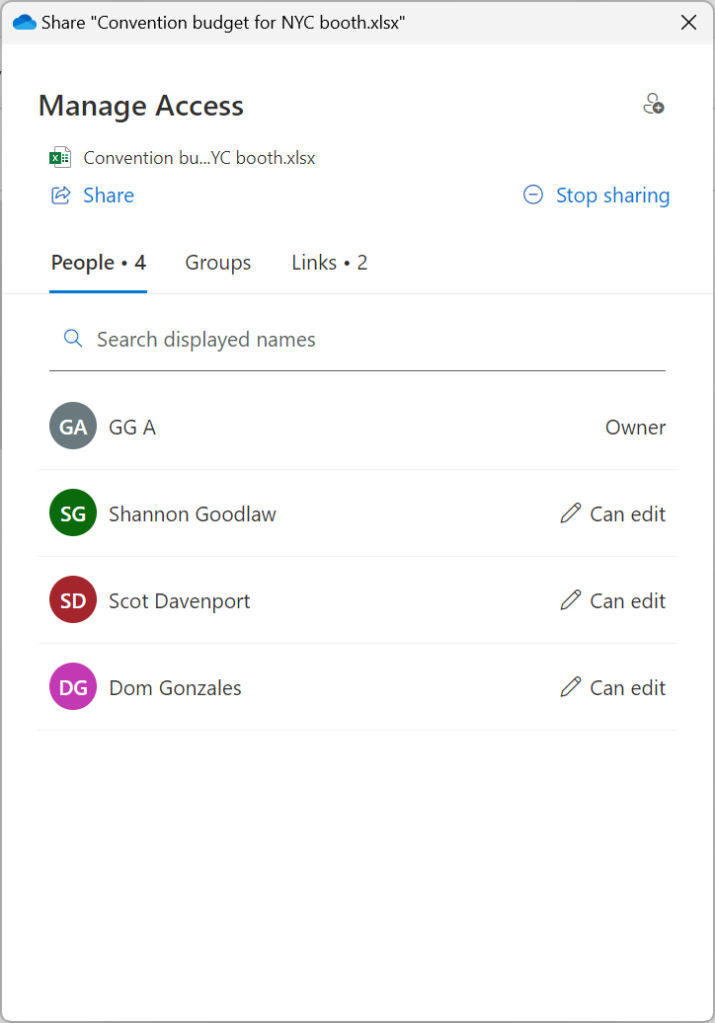
At any time, you can review and modify who has access to your shared files and folders. Navigate to the 'My files' view, hover over the shared item, click the three-dot icon, and select 'Manage access'.
The Manage Access panel provides a comprehensive overview of all sharing arrangements for that specific file or folder. Here, you can see who has been invited directly ('People' tab) and which links have been created ('Links' tab). To completely revoke access for everyone, click the 'Stop sharing' button.
You can manage access permissions or stop sharing a file or folder at any time.
IDG
On the 'People' tab, you can see each individual or group with access and their current permission level (e.g., 'Can edit', 'Can view'). Clicking on the permission level allows you to change it for that specific person or group. On the 'Links' tab, you can see all generated sharing links. For each link, you can click the trash can icon to delete the link and immediately revoke access for anyone using it, or click the gear icon to modify the link's settings, such as changing permissions or extending/removing an expiration date.
Leveraging New Copilot GenAI Features in OneDrive for Web
One of the most significant recent additions to OneDrive for Web is the integration of Microsoft Copilot, the generative AI assistant. These features bring powerful AI capabilities directly into your file management workflow, allowing you to interact with your documents in entirely new ways without even needing to open them in their native applications. Currently, these AI functions are exclusive to the web interface and are not available through the desktop OneDrive client.
Access to Copilot features in OneDrive is tied to specific Microsoft subscriptions. They are available to users with a Microsoft 365 Personal or Family subscription, a Copilot Pro subscription, or a Microsoft 365 Copilot subscription for business. Users on Personal or Family plans have a monthly limit of 60 AI credits (requests to Copilot), while Copilot Pro and M365 Copilot subscribers enjoy unlimited access.
Copilot in OneDrive supports a wide range of text-based file formats, including common types like Word documents, Excel spreadsheets, PowerPoint presentations, PDFs, TXT, and RTF files, as well as newer Microsoft 365 formats. There is currently a file size limit of 150MB for Copilot processing. Microsoft has indicated that support for additional file types, such as images, videos, meeting recordings, and OneNote notebooks, is planned for the future.
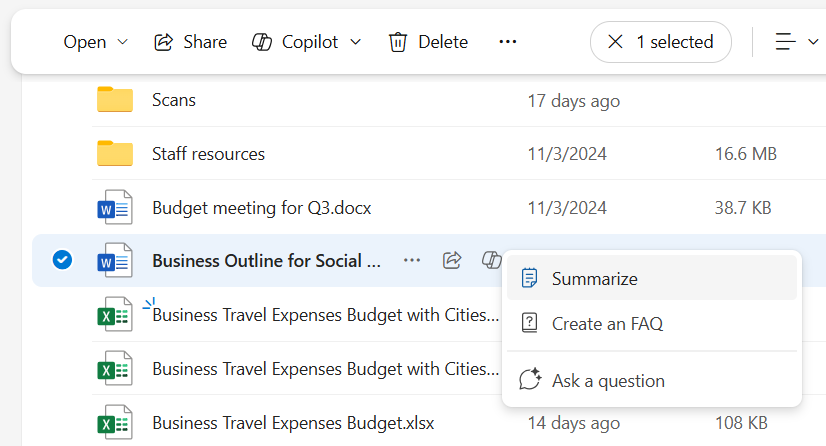
Interacting with a Single File Using Copilot
To use Copilot on a single file, navigate to the file in your 'My files' list. Hover over the file name, and you'll see the Copilot logo appear next to it. Clicking this logo presents a menu with several AI-powered options:
- Summarize: Selecting this option prompts Copilot to analyze the content of the file and generate a concise summary. This is incredibly useful for quickly grasping the main points of lengthy documents, reports, or presentations without needing to read through everything.
- Create an FAQ: This command instructs Copilot to read the file and generate a list of potential frequently asked questions and their answers based on the information contained within the document. This can be valuable for creating training materials, knowledge bases, or quick reference guides from existing content.
- Ask a question: Choosing this opens the Copilot chat panel on the right side of the screen, specifically linked to the selected file. You can then type natural language questions or commands related to the file's content. For example, you could ask an Excel spreadsheet, "What was the total revenue in Q3?" or a Word document, "What are the key recommendations in the conclusion?"
Click the Copilot logo next to a file and choose an option.
Howard Wen / Foundry
When Copilot generates a summary or FAQ list, the results appear in a panel overlaying the screen. You can review the generated text, provide feedback using the thumbs up/down icons to help improve Copilot's responses, and copy the text to your clipboard for use elsewhere. The 'Ask a question' option is also available directly from this results panel, allowing you to delve deeper into the file's content.
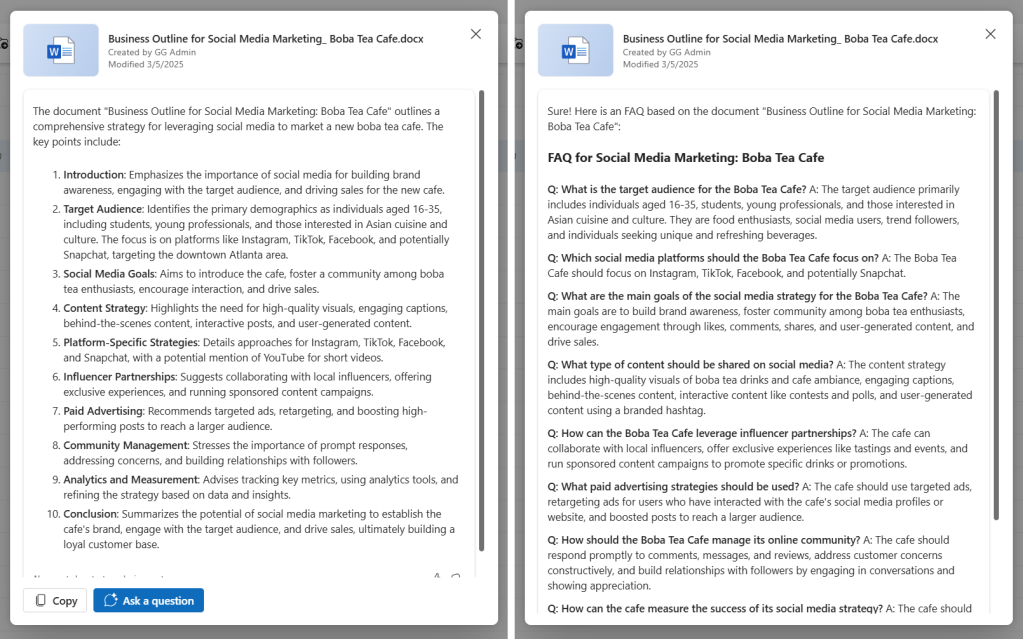
Copilot can generate a summary of or FAQ list for a file.
Howard Wen / Foundry
When you choose 'Ask a question', the Copilot chat panel opens on the right. This interactive panel allows for a conversational experience. You can type your questions or commands in the entry box at the bottom. Copilot will process your request, analyze the content of the selected file, and provide a response within the chat panel. You can continue the conversation, asking follow-up questions to refine the information or explore different aspects of the document. The chat panel also offers helpful tools like a 'View prompts' icon to suggest potential questions and a microphone icon for voice input.
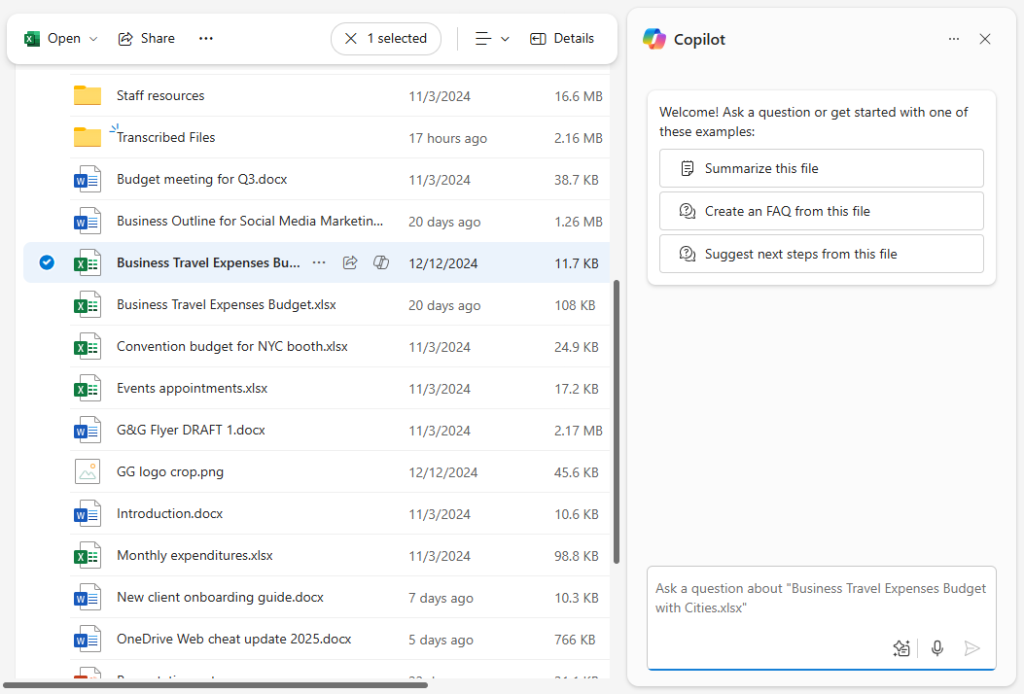
You can enter a question about your file at the bottom of the Copilot chat panel.
Howard Wen / Foundry
Summarizing, Comparing, or Asking Questions About Multiple Files
Copilot's capabilities extend beyond single files. In OneDrive for Web, you can select up to five supported files simultaneously and use Copilot to analyze them collectively. This is particularly powerful for comparing documents, synthesizing information from multiple sources, or getting a consolidated overview.
To use this feature, go to your 'My files' view and select the checkboxes next to the files you want to analyze (up to a maximum of five). Once selected, a 'Copilot' button will appear on the toolbar above the file list. Click this button to reveal a menu with multi-file options:
- Summarize: Generates a summary based on the combined content of all selected files. This is useful for getting a quick overview of a project composed of several documents or presentations.
- Compare files: Instructs Copilot to analyze the selected files and highlight the key differences between them. This is invaluable for comparing different versions of a document, contrasting proposals, or identifying variations in data across spreadsheets.
- Ask a question: Opens the Copilot chat panel, allowing you to ask questions or issue commands that draw information from all the selected files. You could ask for common themes, conflicting points, or specific data points across the entire set of documents.

Select multiple files in your My files list, then ask Copilot to summarize, compare, or chat with you about them.
Howard Wen / Foundry
When you choose 'Summarize' or 'Compare files', the results are presented in an overlay panel, similar to the single-file summary. For 'Compare files', Copilot will typically list the key differences it identified between the selected documents or spreadsheets.

A Copilot-generated comparison of two Excel spreadsheets.
Howard Wen / Foundry
Choosing 'Ask a question' opens the Copilot chat panel, but this time, Copilot's analysis and responses will be based on the content of all the selected files. This allows for sophisticated queries that span multiple documents, providing a powerful way to synthesize information and gain insights from a collection of files.
Upcoming Copilot Features
Microsoft is continuously developing and expanding Copilot's capabilities within OneDrive. The Microsoft 365 Roadmap provides a glimpse into features that have recently launched or are currently rolling out, particularly for M365 Copilot business customers. These include exciting advancements like generating audio summaries of files, the ability to ask Copilot questions about images and meeting recordings (expanding beyond text-based files), converting Word documents into PowerPoint presentations automatically, and the introduction of 'Copilot Agents' — AI-powered assistants designed to perform tasks on your behalf.
While some of these advanced features may initially be exclusive to business plans, Microsoft often brings popular and broadly applicable AI capabilities to Personal/Family and Copilot Pro subscribers over time, suggesting a future where AI plays an even more central role in personal file management and productivity.
OneDrive for Web: A Powerful Productivity Hub
Microsoft's investment in enhancing the web versions of its Microsoft 365 applications is clearly evident in the evolution of OneDrive for Web. What began as a simple cloud storage interface has matured into a sophisticated file management and collaboration hub, now supercharged with generative AI capabilities through Copilot.
If your experience with OneDrive has primarily been through its desktop integration, taking the time to explore OneDrive for Web is highly recommended. Its intuitive interface, comprehensive file management tools, flexible sharing options, and the groundbreaking integration of Copilot AI offer a compelling alternative or complement to the desktop client. Leveraging these features directly in your browser can streamline workflows, enhance collaboration, and provide powerful new ways to interact with your digital content, ultimately delivering a significant boost to your personal and professional productivity.