The Ultimate Guide to Google Docs: Create, Edit, Collaborate, and More
In today's fast-paced digital world, effective document creation, editing, and collaboration are essential for both personal productivity and professional teamwork. Google Docs, Google's web-based word processor, stands out as a leading solution, offering a seamless online experience integrated with cloud storage and powerful collaboration features. Whether you're a student, a professional, or part of a distributed team, understanding how to leverage Google Docs can significantly enhance your workflow.
Google Docs is more than just a free online alternative to traditional desktop word processors. It's a dynamic platform designed for accessibility and real-time collaboration. Accessible through your web browser, it stores your documents securely in Google Drive, making them available from any device with an internet connection. Alongside the web interface, dedicated mobile apps for Android and iOS ensure you can work on the go.
While anyone with a Google account can use the core features of Google Docs for free, Google also offers Google Workspace, a subscription suite that bundles Docs with other essential office apps like Gmail, Google Slides, and Google Sheets, often including advanced features tailored for business and enterprise users. Recent integrations with Gemini, Google's generative AI assistant, further extend the capabilities of Docs, offering AI-powered writing assistance.
This comprehensive guide will walk you through the fundamentals and advanced features of the Google Docs web app. We'll cover everything from creating and opening documents to sharing, collaborating, managing versions, and utilizing the latest AI tools. We'll also touch upon the mobile experience and essential keyboard shortcuts to boost your efficiency.
Getting Started: Creating or Opening a Document
The first step to using Google Docs is accessing the platform and either starting a new document or opening an existing one. You'll need to be signed in to your Google or Google Workspace account to do so. If you're not already signed in, you'll be prompted when you attempt to access Docs or Drive.
Creating a New Document
Google Docs offers several convenient ways to initiate a new document:
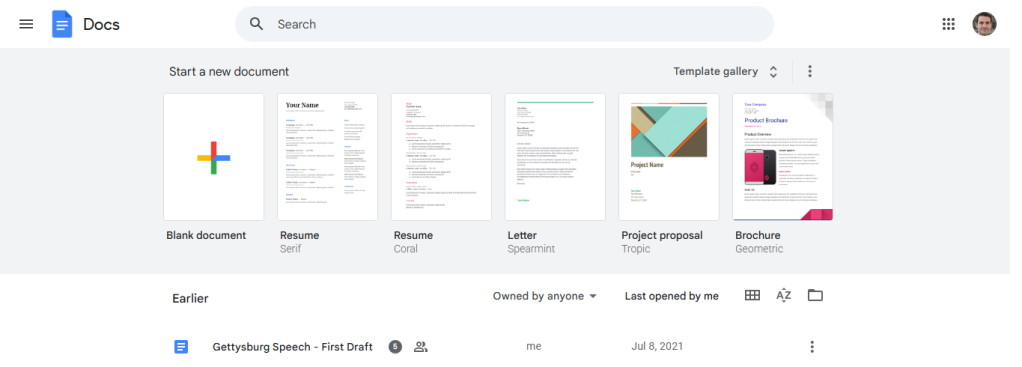
- From the Google Docs home screen: Upon navigating to the Docs home page, you'll see a prominent 'Blank' thumbnail at the top, perfect for starting from scratch. To the right, a selection of popular templates is displayed. Clicking any of these thumbnails will create a new document based on that template. For a wider variety of options, click the 'Template gallery' button in the upper-right corner. This opens a comprehensive collection of templates categorized for different purposes (resumes, letters, reports, etc.). Select any template thumbnail to begin a new document pre-formatted for your needs.
- From the Google Drive home screen: Since Google Docs is integrated with Google Drive, you can also create documents directly from your Drive storage. Click the 'New' button located in the upper-left corner. From the dropdown menu, select 'Google Docs' to create a blank document. If you prefer to start with a template, hover your cursor over 'Google Docs' and select 'From a template' from the submenu. This action will take you to the Google Docs home screen's full template gallery.
- From your browser's address bar: For the quickest way to start a blank document, simply type
docs.newinto the address bar of your web browser and press Enter. This shortcut works seamlessly if you are already signed in to your Google or Google Workspace account in that browser session.
Opening an Existing Document
Accessing documents you've previously created or that have been shared with you is straightforward:
- From Google Docs or Google Drive home screens: Both the Google Docs and Google Drive home screens display a list of your recent documents. Simply double-click the document you wish to open, and it will load in the Google Docs web app.
- Using Search: If your document list is long, use the search box at the top of either the Docs or Drive home screen. You can search by the document's file name or by specific text content within the document.
- Browsing Google Drive from Docs: On the Google Docs home screen, clicking the folder icon located to the right above the document list opens a simplified view of your Google Drive within a side panel, allowing you to browse and open files stored there.
- Accessing Shared Documents: Documents that others have shared with you via Google Drive can be found on the Google Drive home screen. Click 'Shared with me' in the left-hand navigation column, and then double-click the document to open it in Google Docs.
Uploading a Document for Editing
If you have documents created in other word processors, such as Microsoft Word, or even PDFs and images of scanned documents, you can upload them to Google Drive and edit them in Google Docs. Google Docs supports various common formats, including .docx, .odt, .txt, and .rtf.
- Uploading via the Google Docs home screen: Click the folder icon above the document list on the right. In the panel that appears, select the 'Upload' tab. You can drag and drop files onto this panel or use the 'Select a file from your device' button to browse your computer. Files uploaded this way are automatically converted to the Google Docs format and open immediately for editing.
- Uploading via the Google Drive home screen: Click 'New' in the upper-left corner, then select 'File upload'. Choose the document from your computer. When uploaded through Drive, the document retains its original format (e.g., a .docx file remains a .docx file).
Working with Microsoft Word Documents in Docs
A particularly useful feature is Google Docs' ability to edit Microsoft Word (.docx) files natively. This means you can open, edit, and collaborate on a Word file directly within Google Docs without converting it, and all changes are saved back to the original .docx file. This is especially helpful when collaborating with people who primarily use Microsoft Word.
To maintain the original Word format, it's crucial to upload the file through the Google Drive home screen ('New' > 'File upload'). Uploading a .docx file via the Google Docs home screen's upload tab will automatically convert it to the Google Docs format (.gdoc). In your Google Drive document list, Word documents are easily identifiable by a 'W' icon, distinct from the standard Google Docs icon.

If you prefer to have all uploaded documents, including Word files, automatically converted to Google Docs format, you can adjust a setting in Google Drive. Click the gear icon in the upper-right corner of the Google Drive home screen, select 'Settings', and under the 'Uploads' section, check the box labeled 'Convert uploads to Google Docs editor format'.
Converting PDF and Image Files to Docs Format
Google Drive also offers a handy feature to convert text from PDF files or image files (like scanned documents) into editable text within Google Docs. The success and accuracy of this conversion depend heavily on the clarity and readability of the text in the original file.
To do this, first upload the PDF or image file to Google Drive using 'New' > 'File upload'. Once the file is uploaded, locate it in your Drive list, right-click on its filename, and select 'Open with' > 'Google Docs'.
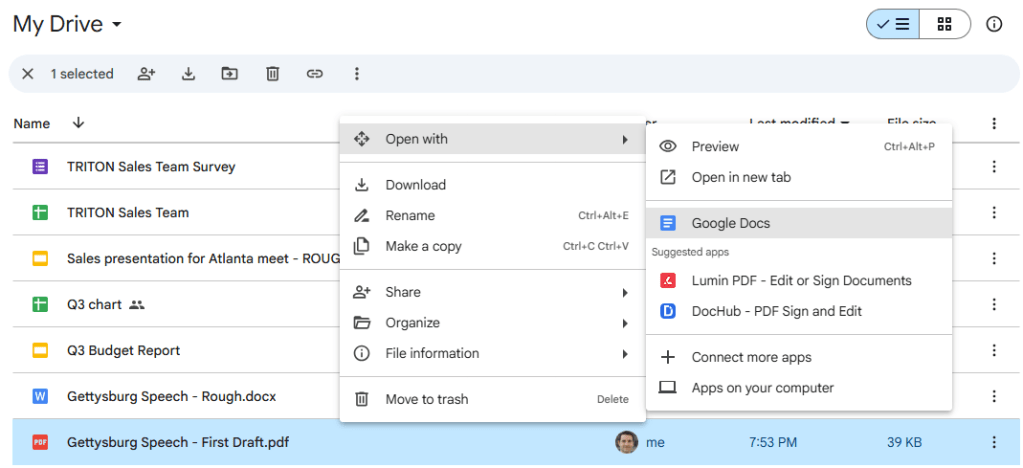
Google Drive will process the file, attempting to extract the text using Optical Character Recognition (OCR). The converted text will open as a new, editable Google Docs document. Note that this process primarily focuses on text; images present in the original PDF or image file will typically not be included in the converted document.
Working Within a Document: Interface and Tools
Once you have a document open in Google Docs, you're presented with a clean and functional interface designed for both individual work and collaboration.
At the top left of the screen, you'll see the document's title. If it's a new document, it might be titled "Untitled document." Simply click on the title area and start typing to rename your document. Google Docs automatically saves your changes as you type, so there's no need for a manual 'Save' button.
The Menu Bar and Toolbar
Below the title is the menu bar, offering a comprehensive set of commands organized into dropdown menus:
- File: Contains actions related to the document as a whole, such as creating new documents, opening existing ones, making copies, sharing, renaming, moving to folders, managing version history, downloading in various formats, emailing, setting up the page, and printing.
- Edit: Standard editing commands like Undo, Redo, Cut, Copy, Paste, Paste without formatting, Select all, and Find and replace.
- View: Controls how you see the document and interact with it. Options include changing the mode (Editing, Suggesting, Viewing), showing or hiding rulers, outlines, and non-printing characters, and adjusting the zoom level.
- Insert: Allows you to add various elements to your document, such as images, tables, drawings, charts, horizontal lines, footnotes, special characters, equations, headers, footers, page numbers, page breaks, links, comments, and building blocks.
- Format: Provides options for formatting text (bold, italic, underline, size, color, etc.), paragraphs (alignment, indentation, line spacing), columns, bullets and numbering, headers and footers, and clearing formatting.
- Tools: Includes helpful utilities like Spelling and grammar check, Word count, Translate document, Voice typing, comparing documents, and accessing the dictionary.
- Extensions: Where you can find and manage third-party add-ons that integrate with Google Docs and other Google Workspace applications to extend their functionality.
- Help: Offers access to the Google Docs help center, training resources, and a search bar to quickly find commands or get help on specific tasks. You can also find the keyboard shortcuts list here.
Directly below the menu bar is the toolbar, which provides quick access to the most frequently used formatting and editing functions. This includes buttons for changing font type and size, applying bold, italic, or underline styles, text color, highlighting, inserting links and images, aligning text, creating lists, adjusting line spacing, and spell checking.
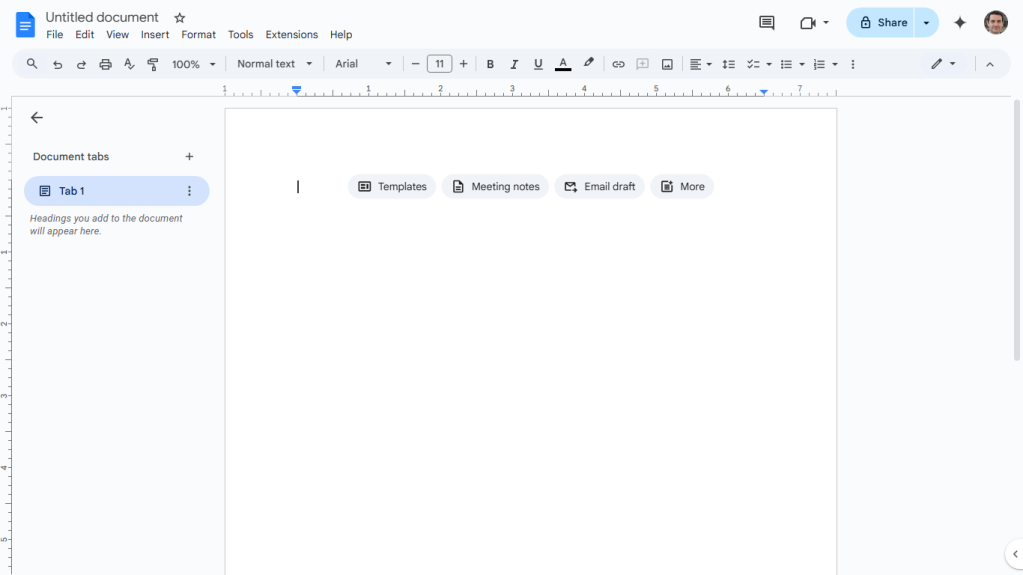
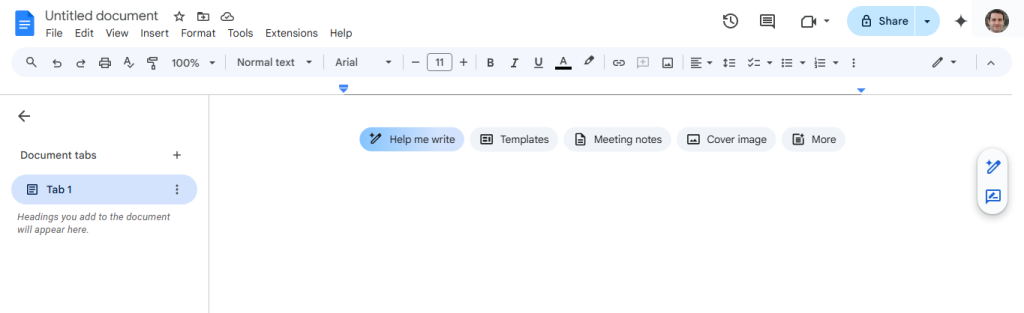
Tools to Help You Start Writing (Quick Start Buttons)
When you open a brand new, blank document, Google Docs presents a row of buttons just above the document area. These are quick shortcuts designed to help you get started efficiently. They disappear once you begin typing content into the document.
The specific quick start buttons you see may vary slightly depending on whether you are using a free Google account or a paid Google Workspace plan that includes Gemini features.
For Free or Business Starter Plans:
- Templates: This button opens a side pane showcasing a selection of popular templates from the full gallery, providing a quick way to apply a pre-designed structure to your document. You can access the full template gallery anytime via File > New > From a template.
- Meeting notes, Email draft, and More: These buttons introduce you to "building blocks," which are pre-formatted table templates that can be inserted into your document. Some building blocks also incorporate interactive elements known as "smart chips." For a deeper dive into smart chips and building blocks, refer to resources like "How to use smart chips in Google Docs and Sheets".
Clicking Meeting notes allows you to pull information directly from a scheduled event on your Google Calendar and format it into a structured table within your document.
The Email draft building block inserts a basic email composition interface into your document. You can add recipients in the 'To,' 'Cc,' and 'Bcc' fields, which function as smart chips, allowing you to select contacts from your Google Contacts list.
The More button opens a side panel specifically for "Building blocks," listing various templates for different purposes, including project management, contact lists, and more.
You can access building blocks at any time by going to Insert > Building blocks in the top menu bar and selecting the desired block or choosing 'View more' to open the side panel.
For Paid Workspace Plans with Gemini:
If your Google Workspace plan includes Gemini features (such as Business Standard or higher, Google AI Pro or higher, or if you've signed up for Google Workspace Labs), you'll see additional AI-powered quick start buttons:
- Help me write: This button opens a pane overlaying your document where you can enter prompts for Gemini to generate text. This AI assistant can help you brainstorm ideas, draft content, or even rewrite existing text. Learn more about this feature in "How to use Gemini AI to write (and rewrite) in Google Docs and Gmail." You can also access Help Me Write via a vertical mini-toolbar on the right side of your document.
- Templates and Meeting notes: These function identically to the buttons described for free/Business Starter plans.
- Cover image: This allows you to easily insert a banner image at the top of your document, useful for branding or visual appeal. You can upload images from your computer, Google Drive, or Google Photos, search stock images, link to an online image, or even use Gemini to generate a custom image based on your description. This option is also available via Insert > Cover image in the menu bar.
- More: This button also opens the "Building blocks" side panel, offering the same selection as in other plans.
The Gemini Sidebar
Beyond the quick start buttons, Gemini is also accessible through a dedicated sidebar in Google Docs for eligible Workspace users. Click the nova star icon in the upper-right corner (near your profile picture) to open this panel. (Users on free or Business Starter plans will typically see an advertisement for Gemini trials here).

The Gemini sidebar is a versatile tool for various document-related tasks. You can use it to brainstorm content ideas, generate different versions of text, summarize lengthy documents, create outlines or lists, and more. It acts as a conversational AI assistant directly within your document editing environment. For detailed ways to utilize this feature, explore resources like "Google Workspace: 7 great ways to use the Gemini AI sidebar".
Editing, Suggesting, and Viewing Modes
Google Docs offers different modes to control how you interact with a document, particularly useful in collaborative scenarios:
- Editing mode: This is the default mode when you create or open a document. In this mode, any changes you make are applied directly to the document content. This is your primary mode for writing and making final edits.
- Suggesting mode: In this mode, your changes are not applied directly but appear as colored suggestions or proposed edits. Text you add is highlighted in a specific color, and text you delete is shown with a strikethrough in the same color. These suggestions appear alongside the document in comment-like boxes, allowing others (or yourself later) to review and either accept or reject them. This mode is invaluable for collaborative review and editing, providing a clear track record of proposed changes before they become permanent.
- Viewing mode: This mode turns the document into a read-only file. You can scroll through and read the content, but you cannot make any edits or suggestions. This mode is useful when you want to focus solely on reviewing the document without accidentally changing anything, or when sharing a document where you only want recipients to be able to read it.
You can switch between these modes easily. Look for the pencil icon at the far right of the toolbar. Clicking it reveals a dropdown menu where you can select 'Editing', 'Suggesting', or 'Viewing'. Alternatively, you can access these options via the menu bar: View > Mode.

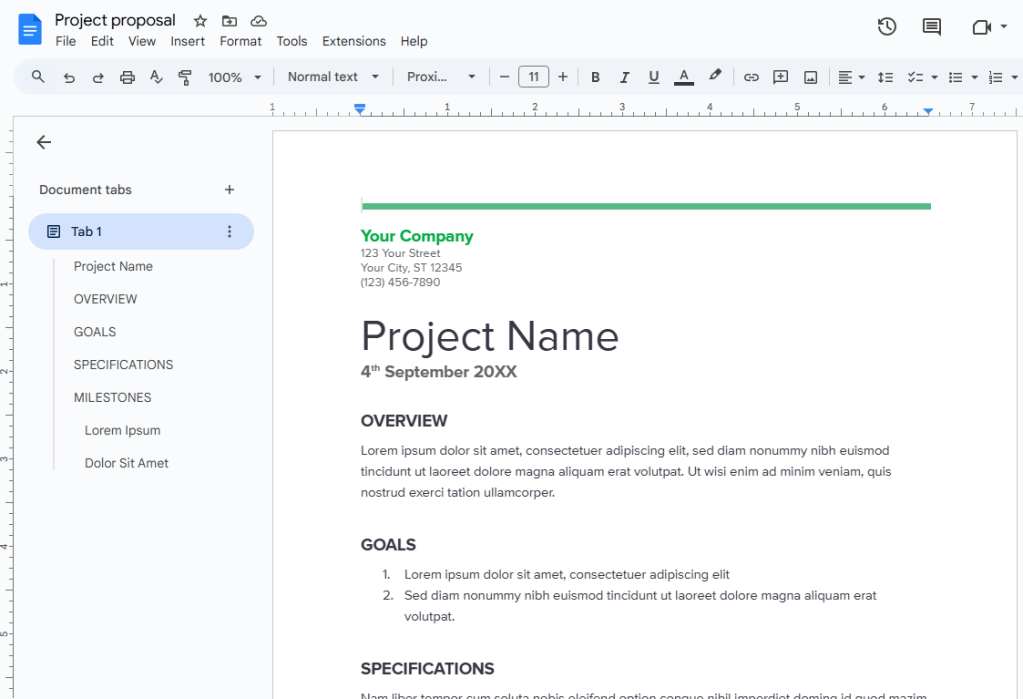
Document Tabs
Located along the left side of the Google Docs interface is the "Document tabs" side panel. If you don't see it, click the 'Show tabs & outlines' button at the top left. This feature allows you to structure complex documents in unique ways, enhancing navigation and organization.
Heading Links (Document Outline)
By default, your document is listed in this panel as "Tab 1." Clicking on "Tab 1" expands it to show an outline generated from the headings within your document. Google Docs automatically detects text formatted as Heading 1, Heading 2, etc., and lists them here. Clicking any heading in this outline panel will instantly jump your view in the main document window to that specific heading.
To add a heading that appears in this outline, select the text you want to make a heading, then go to the toolbar above your document. Click the dropdown that likely says 'Normal text' and select the desired heading level (e.g., 'Heading 1', 'Heading 2').
You can rename the default "Tab 1" by clicking the three-dot icon next to it in the side panel and selecting 'Rename'.
Multiple Tab Links
The "Document tabs" feature also allows you to create multiple distinct sections, or "tabs," within a single Google Docs file. Each tab can contain its own content and formatting, effectively functioning like separate documents but housed together under one main document title. This is incredibly useful for organizing large projects or complex information.
Imagine a project plan document. Instead of having separate files for the project overview, team members, timeline, and budget, you could create one Google Doc with multiple tabs: one for the Overview, one for Team, one for Timeline, and one for Budget. Each tab can be formatted differently (e.g., the Timeline tab might primarily contain a table), but they are all part of the same overarching document.
To add a new tab (which will be named "Tab 2" by default), click the '+' icon next to "Document tabs" in the side panel. The main window will switch to a blank area for this new tab's content. You can add content, format it, and add headings just as you would in a standard document.
You can easily switch between these tabbed sections by clicking their names in the "Document tabs" navigation panel. You can add as many tabs as needed and even create subtabs nested under main tabs by hovering over a tab, clicking the three-dot icon, and selecting 'Add subtab'.

Renaming tabs from the default "Tab 1," "Tab 2," etc., is highly recommended for clarity. Click the three-dot icon next to the tab name, select 'Rename', and enter a descriptive name.
Links to Headings Across Tabs
A powerful aspect of using multiple tabs is the ability to create internal links that jump from content in one tab to a specific heading in another tab within the same document. This allows for seamless navigation between related sections.
To create such a link: First, ensure the destination section has a heading applied (using the Heading 1, 2, etc., styles). In the "Document tabs" side panel, select the tab containing the heading you want to link to. In the main document window, right-click on that specific heading. From the context menu, select 'Copy heading link'.
Now, switch to the tab where you want to place the link. In the main window, paste the copied link (Ctrl+V or Cmd+V). Initially, you'll see a long URL. A bar will appear next to it containing the title of your document. Click this bar or press the Tab key to convert the URL into a cleaner, interactive capsule displaying your document's title.

When you (or a collaborator) click this capsule, a small bar will appear showing the linked heading's text. Clicking this text will instantly take you to that heading in the other tabbed section of the document. This creates a highly interactive and organized document structure.
Sharing Your Document: Collaboration Made Easy
One of Google Docs' most celebrated features is its robust sharing and collaboration capability. You can easily share your documents with individuals or groups, controlling their level of access.
To initiate sharing, click the prominent 'Share' button located in the upper-right corner of the Google Docs editing screen. Alternatively, from the Google Drive home screen, right-click on the document's filename and select 'Share' > 'Share' from the context menu. Both actions open the Share pane.

Google Docs offers two primary methods for sharing: privately with specific individuals or publicly via a shareable link. For most business or team contexts, private sharing is the preferred and more secure method.
Note: In organizational settings using Google Workspace, administrators may impose restrictions on sharing options, potentially limiting public sharing or sharing outside the organization.
Sharing Privately (with Specific People)
To share your document with particular people, type their names or email addresses into the 'Add people or groups' field at the top of the Share pane. As you type, Google will suggest contacts from your address book.
After adding individuals, the Share pane updates to show the list of people you are inviting. Here, you can add more recipients and, crucially, define their access permissions for the document. You can also include a brief message that will be sent with the email invitation.

By default, invited individuals are granted 'Editor' access. You can change this permission level for each person by clicking the 'Editor' dropdown next to their name and selecting one of the following options:
- Editor: This permission level grants the most control. Editors can make any changes to the document content, add comments, and also share the document with other people.
- Commenter: Commenters can view the document and add comments and suggestions, but they cannot directly edit the main content. This is ideal for review processes where feedback is needed without altering the original text.
- Viewer: Viewers can only open and read the document. They cannot make changes, add comments, or share the document with others. This is suitable for distributing final versions or reference materials.
Remember that the permission you select from the dropdown applies to the specific person or group listed next to it. Once you have added all recipients and set their permissions, click the 'Send' button. An email containing a link to the document will be sent to everyone you invited.
Changing, Limiting, or Revoking Permissions
You retain control over shared documents and can modify permissions at any time. Simply reopen the Share pane for the document. It will display a list of everyone who currently has access. Click the dropdown menu next to a person's name to change their permission level (e.g., downgrade an Editor to a Commenter) or select 'Remove access' to revoke their access entirely. After making changes, click 'Save'.
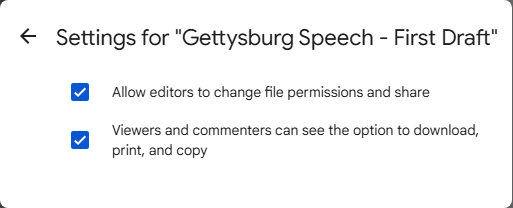
You can also set general limitations on what collaborators can do, regardless of their specific permission level. Click the gear icon in the upper-right corner of the Share pane. Here you'll find options:
- Unchecking the first box ('Editors can change permissions and share') prevents users with Editor access from inviting new people or changing the permission levels of existing collaborators.
- Unchecking the second box ('Viewers and commenters can see the option to download, print, and copy') restricts users with Viewer or Commenter status from downloading, printing, or copying the document content.
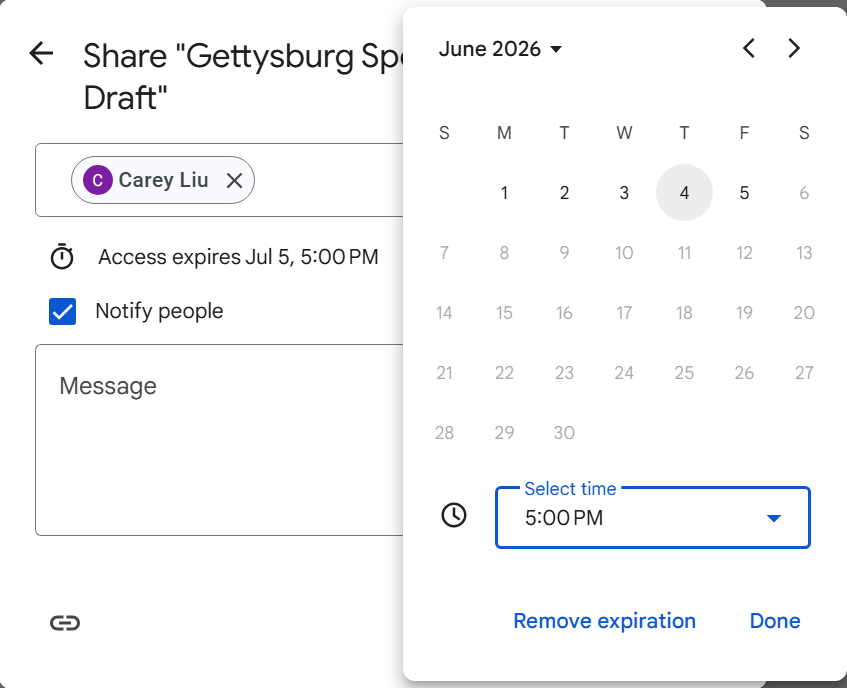
Setting an Expiration Date (Google Workspace)
For Google Workspace users, an additional security feature is the ability to set an expiration date for an individual's access to a shared document. This is useful for temporary collaborations or when access should be automatically revoked after a project concludes.
In the Share pane, click the down arrow next to a collaborator's name and select 'Add expiration'. A calendar interface will appear, allowing you to select a specific date (and optionally a time) within the next year when their access will automatically expire. Click 'Save' to apply the expiration.
Sharing Publicly (Anyone with the Link)
Sometimes, you might need to share a document more broadly, making it accessible to anyone who has the link, without requiring them to sign in or be explicitly invited. This is handled in the lower section of the Share pane, under 'General access'.
By default, the setting is usually 'Restricted', meaning only people explicitly added above can open the document. To make it public, click 'Restricted' and select 'Anyone with the link' from the dropdown menu.

Once 'Anyone with the link' is selected, you need to define the default permission level for these public viewers. Click the 'Viewer' dropdown to the right and choose:
- Viewer: Anyone with the link can only read the document.
- Commenter: Anyone with the link can read the document and add comments/suggestions.
- Editor: Anyone with the link can fully edit the document. Use this option with extreme caution, as it grants full editing power to potentially anyone on the internet who finds the link.
After setting the general access level and permissions, click the 'Copy link' button. The link is copied to your clipboard, ready to be pasted into emails, messages, websites, or social media posts. Be mindful that sharing a document publicly means it could potentially be accessed by a very wide audience.
To revert a document from public sharing back to restricted access, reopen the Share pane, click 'Anyone with the link', select 'Restricted' from the dropdown, and click 'Done'.
Status of Your Shared Documents
To quickly identify which of your documents are being shared, look for the icon of two silhouetted heads next to the document's filename on your Google Drive or Google Docs home screen (in list layout). This icon indicates that the document is shared, either privately or publicly.
Collaborating on Your Document: Working Together in Real Time
The true power of Google Docs shines in its real-time collaboration features. When you share a document with others and grant them Editor or Commenter permissions, multiple people can work on the document simultaneously, seeing each other's changes as they happen. For a detailed walkthrough on the mechanics of adding comments, making edits, and collaborating in real-time, you can refer to resources like the "Google Drive collaboration guide".
A key feature for managing collaborative edits is the Suggesting mode, discussed earlier. While Editors can choose to work in Editing mode (where changes are permanent immediately), encouraging all collaborators, especially Editors, to use Suggesting mode is highly recommended. Commenters are automatically placed in Suggesting mode.
In Suggesting mode, each collaborator's contributions are visually distinct. Text they add appears in a unique color, and text they propose to delete is marked with a strikethrough in that same color. This color-coding makes it easy to track who made which proposed change.
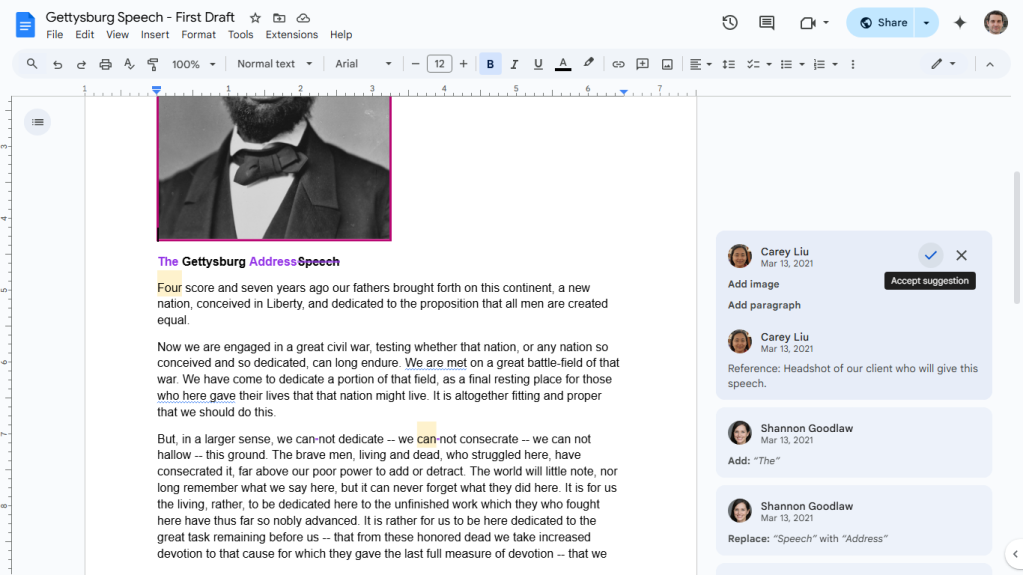
Proposed changes appear as note cards in the right-hand margin of the document. Each card shows the suggested edit, the name of the collaborator who made it, and a timestamp. As the document owner or an Editor, you can review each suggestion individually. To accept a suggestion and apply it to the document, click the checkmark icon on the note card. To reject a suggestion and discard it, click the 'X' icon.
For documents with many suggested edits, reviewing them one by one can be time-consuming. Google Docs provides tools to streamline this process. Go to Tools > Review suggested edits in the top menu bar. A box will appear in the upper-right corner of the screen.
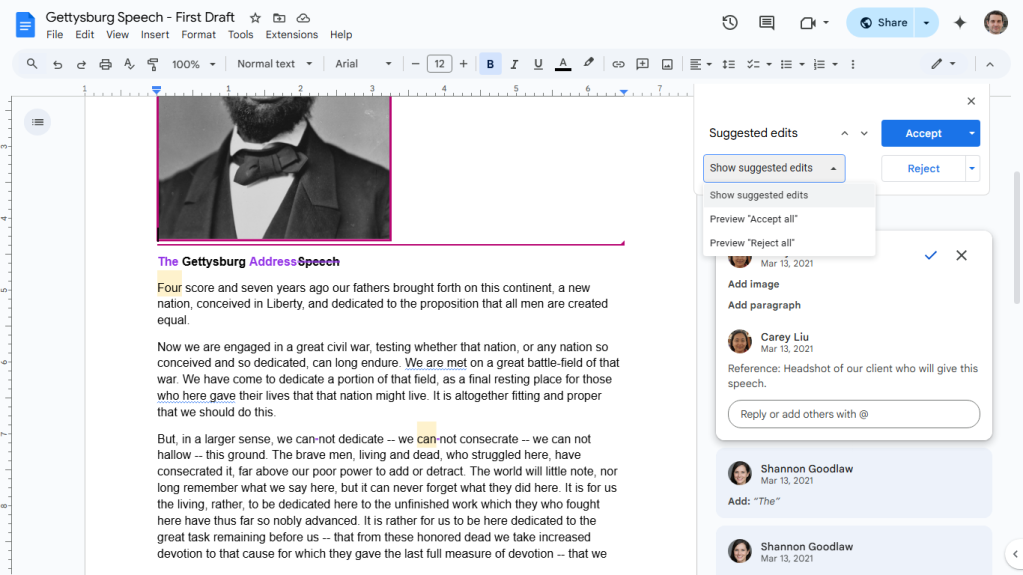
From this box, you can preview the document with all suggestions accepted ('Preview "Accept all"') or rejected ('Preview "Reject all"') by clicking the 'Show suggested edits' dropdown. If you're satisfied after previewing or simply want to apply all changes at once, you can click the 'Accept All' or 'Reject All' buttons directly in this pane. This allows for efficient finalization of collaborative drafts.
Google Docs also provides visual cues on the home screens. When a shared document receives new suggested edits from collaborators, an updated tally or indicator may appear next to its filename or on its thumbnail, alerting you to recent activity.
Recovering Older Versions of a Document: Version History
Accidents happen, and sometimes you need to revert to a previous state of your document, whether due to accidental deletions, unwanted edits, or simply deciding a previous version was better. Google Docs' automatic saving is coupled with a robust version history feature that tracks every change made to the document.
To access the version history, open the document and click File > Version history > See version history from the top menu bar.
A panel will open on the right side of your screen, listing all saved versions of your document. These versions are automatically saved periodically as changes are made and are typically organized by date and time. If multiple collaborators were working on the document, you'll often see versions grouped by the user who made the edits during that session.
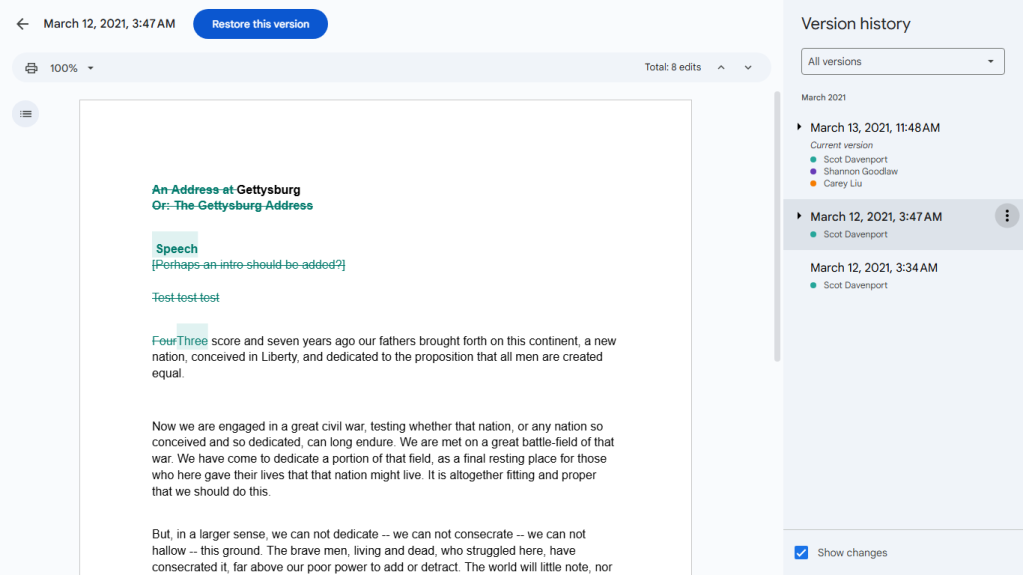
To view what an earlier version of the document looked like, click on its date or the name associated with that version in the list. The main document window will temporarily display that historical version. Google Docs highlights the changes made in that version compared to the previous one, often color-coding them by the user who made the edits.
If you decide that an older version is preferable to the current one, you can easily restore it. While viewing the desired historical version, click the blue 'Restore this version' button located in the upper-left corner of the screen. This action will replace the current version of your document with the selected older version. The restored version will then appear at the top of your version history list as the most recent state.
For easier reference, you can give specific versions meaningful names instead of just relying on the automatic date/time stamps. Click on the date/time of a version in the history panel, and you'll be prompted to type in a custom name. The original date and time will still be visible in smaller text below the custom name.
Downloading and Exporting Your Document
While Google Docs is primarily a cloud-based tool, there are times when you might need a local copy of your document, perhaps to share with someone who doesn't use Google Docs, to print, or to save in a specific format. Google Docs makes it easy to download and export your documents in various file types.
With your document open, navigate to the top menu bar and click File > Download. A submenu will appear listing the available export formats:
- Microsoft Word (.docx)
- OpenDocument Format (.odt)
- Rich Text Format (.rtf)
- PDF Document (.pdf)
- Plain Text (.txt)
- Web page (.html, zipped)
- EPUB publication (.epub)

Select the desired format, and the document will be downloaded to your computer's default download location in that file type. If your document was originally a .docx file that you edited natively in Docs, selecting Microsoft Word (.docx) here will download the updated file in its original format.
Another way to share your document in a different format is via email. Go to File > Email. You have a few options:
- Email this file: Opens a panel allowing you to compose an email with your current document attached. The default attachment format is PDF, but you can click the dropdown next to 'PDF' to select Word (.docx) or another format. You can add recipients, a subject, and a message before sending.
- Email collaborators: This option opens a similar email composition panel but automatically pre-populates the 'To' field with the email addresses of everyone you have shared the document with. You can still choose the attachment format.
- Email draft: As mentioned earlier, this inserts the Email draft building block into your document, allowing you to compose an email directly within the document itself before sending it via Gmail.
Using the Google Docs Mobile App
For those who need to access or work on documents away from a desktop or laptop, Google offers dedicated Google Docs mobile apps for Android, iPhone, and iPad. These apps are designed with a simplified interface optimized for touchscreens, making it convenient to manage documents on smaller devices.
While the interface is streamlined, most of the core functionalities available in the web app are also present in the mobile versions. You can create new documents, open existing ones from your Google Drive, and edit content. Sharing and collaboration features are fully supported, allowing you to share documents with others and work together in real-time, including utilizing the Suggesting mode for collaborative edits.
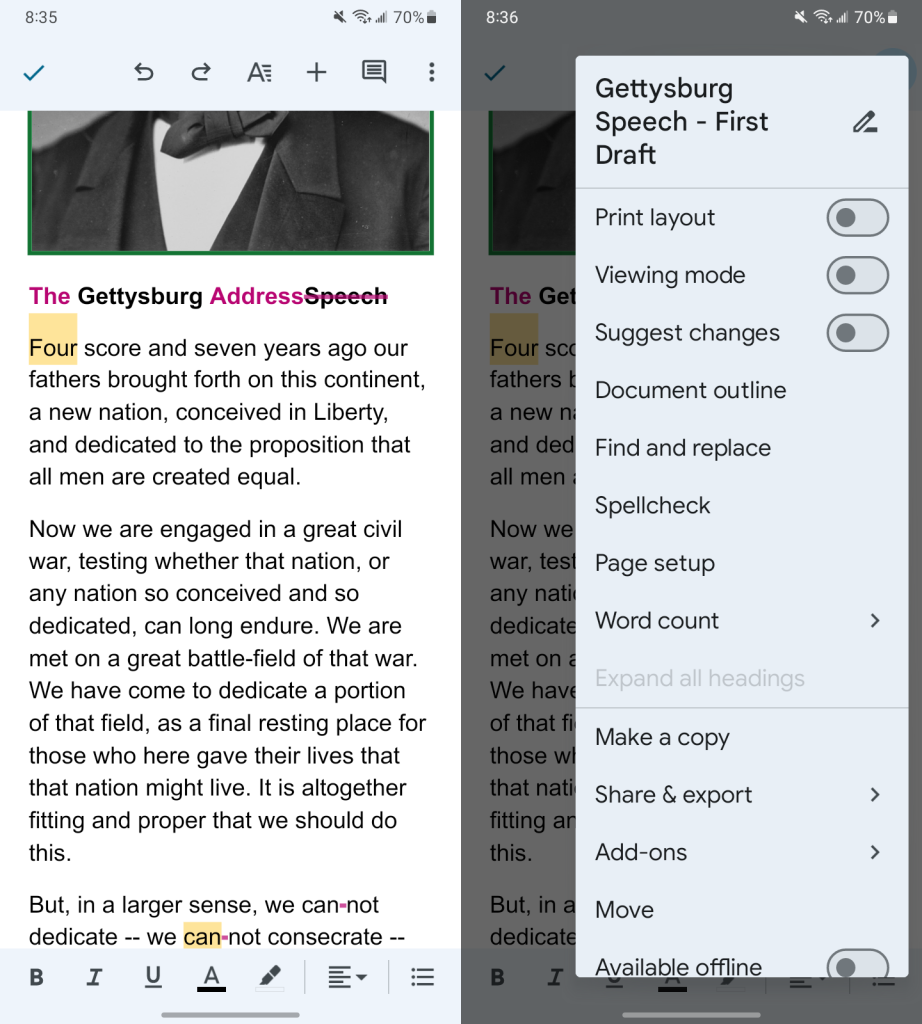
Toolbars at the top and bottom of the mobile app provide quick access to common formatting options (bold, italic, underline, text alignment, etc.) and insertion tools (images, tables, links). Clicking the three-dot menu icon, typically located at the top right, reveals additional options, including switching modes (Editing, Suggesting, Viewing), running spell check, accessing document details, and managing sharing settings.
While extensive writing or complex formatting might be more comfortable on a larger screen, the mobile app is invaluable for making quick edits, reviewing documents, adding comments, or simply keeping track of changes made by collaborators while you're away from your computer. Any changes you make through the mobile app are automatically saved to your Google Drive and will be reflected the next time you open the document on any device.
Boosting Efficiency with Keyboard Shortcuts
For users who spend a significant amount of time working in Google Docs, mastering keyboard shortcuts can dramatically increase productivity by allowing you to perform common actions quickly without reaching for the mouse. Google Docs supports a wide range of shortcuts.
You can find a comprehensive list of shortcuts within Google Docs itself by going to Help > Keyboard shortcuts. This opens a dialog box listing shortcuts categorized by function. For an even more extensive and up-to-date list, consult Google's official Google Docs keyboard shortcuts support page.
Here is a table highlighting some of the most frequently used and helpful keyboard shortcuts:
| BASICS | ||
| Action | Chrome OS / Windows shortcut | macOS shortcut |
| Copy | Ctrl-C | ⌘-C |
| Cut | Ctrl-X | ⌘-X |
| Paste | Ctrl-V | ⌘-V |
| Undo | Ctrl-Z | ⌘-Z |
| Redo | Ctrl-Y | ⌘-Y |
| Insert or edit link | Ctrl-K | ⌘-K |
| Open link | Alt-Enter | Option-Enter |
| Find | Ctrl-F | ⌘-F |
| Find and replace | Ctrl-H | ⌘-Shift-H |
| Select all | Ctrl-A | ⌘-A |
| Insert comment | Ctrl-Alt-M | ⌘-Option-M |
| Check spelling and grammar | Ctrl-Alt-X | ⌘-Option-X |
| Open dictionary | Ctrl-Shift-Y | ⌘-Shift-Y |
| Ctrl-P | ⌘-P | |
| TEXT AND PARAGRAPH FORMATTING | ||
| Action | Chrome OS / Windows shortcut | macOS shortcut |
| Bold | Ctrl-B | ⌘-B |
| Italicize | Ctrl-I | ⌘-I |
| Underline | Ctrl-U | ⌘-U |
| Numbered list | Ctrl-Shift-7 | ⌘-Shift-7 |
| Bulleted list | Ctrl-Shift-8 | ⌘-Shift-8 |
| Align text left | Ctrl-Shift-L | ⌘-Shift-L |
| Align text right | Ctrl-Shift-R | ⌘-Shift-R |
| Copy text formatting | Ctrl-Alt-C | ⌘-Option-C |
| Paste text formatting | Ctrl-Alt-V | ⌘-Option-V |
Source: Google
Conclusion
Google Docs has evolved into a sophisticated and indispensable tool for document creation and collaboration in the digital age. Its accessibility from any web browser, seamless integration with Google Drive, powerful real-time collaboration features, and useful tools like version history and AI assistance make it a versatile choice for individuals and teams alike. By understanding and utilizing the features outlined in this guide – from basic document handling and formatting to advanced sharing permissions, collaborative modes, and mobile access – you can significantly enhance your productivity and streamline your document workflows. Whether you're drafting a simple letter, writing a complex report, or collaborating on a major project, Google Docs provides the tools you need to succeed.
For more tips and tutorials on maximizing your use of Google's suite of tools, explore additional Google Workspace resources.